Max Parker
2024-08-19 11:21:32
www.trustedreviews.com
In recent years Netflix has cracked down on password sharing and now prevents anyone outside of the subscriber’s household from sharing an account.
This means if Netflix detects that someone outside of a household is using your Netflix account, then it will automatically send the account holder a one-time code via either email or SMS, for the user in question to enter within a limited amount of time.
Fortunately you don’t have to break the rules if you want to allow someone outside of your household to use your Netflix account. Instead, you can simply add them as a member to your existing subscription, however it’s worth mentioning that this will come at an extra cost.
Standard members can add one extra member to their plan while Premium members can add up to two, with Netflix charging £4.99/$7.99/€5.99 per member, on top of your subscription plan.
Read on to learn how to add a new member to your Netflix plan, so they can get their own profile, watch list and parental controls settings.
What you’ll need:
- A Netflix account (the number of members available varies depending on which Netflix tier you subscribe to)
The short version:
- Go to your Netflix account
- Go to the Account button
- Click on Account
- Go to Buy an Extra an extra member slot
- Click Next
- Click Start Extra Member
- Click Next
- Enter the name and email address of your extra member
- Click Next
- Choose which Profile you want for your extra member
- Go back to Netflix
Pixel 8a for just £374.40
Making it the ultimate go-to upgrade thanks to its limited time price cut, the Pixel 8a is now a bargain buy that’s still packed with all the features you could ever need.
- Voxi
- Was £499
- Now just £374.40
-
Step
1Go to your Netflix account

Log into your Netflix account.

-
Step
2Select your profile picture
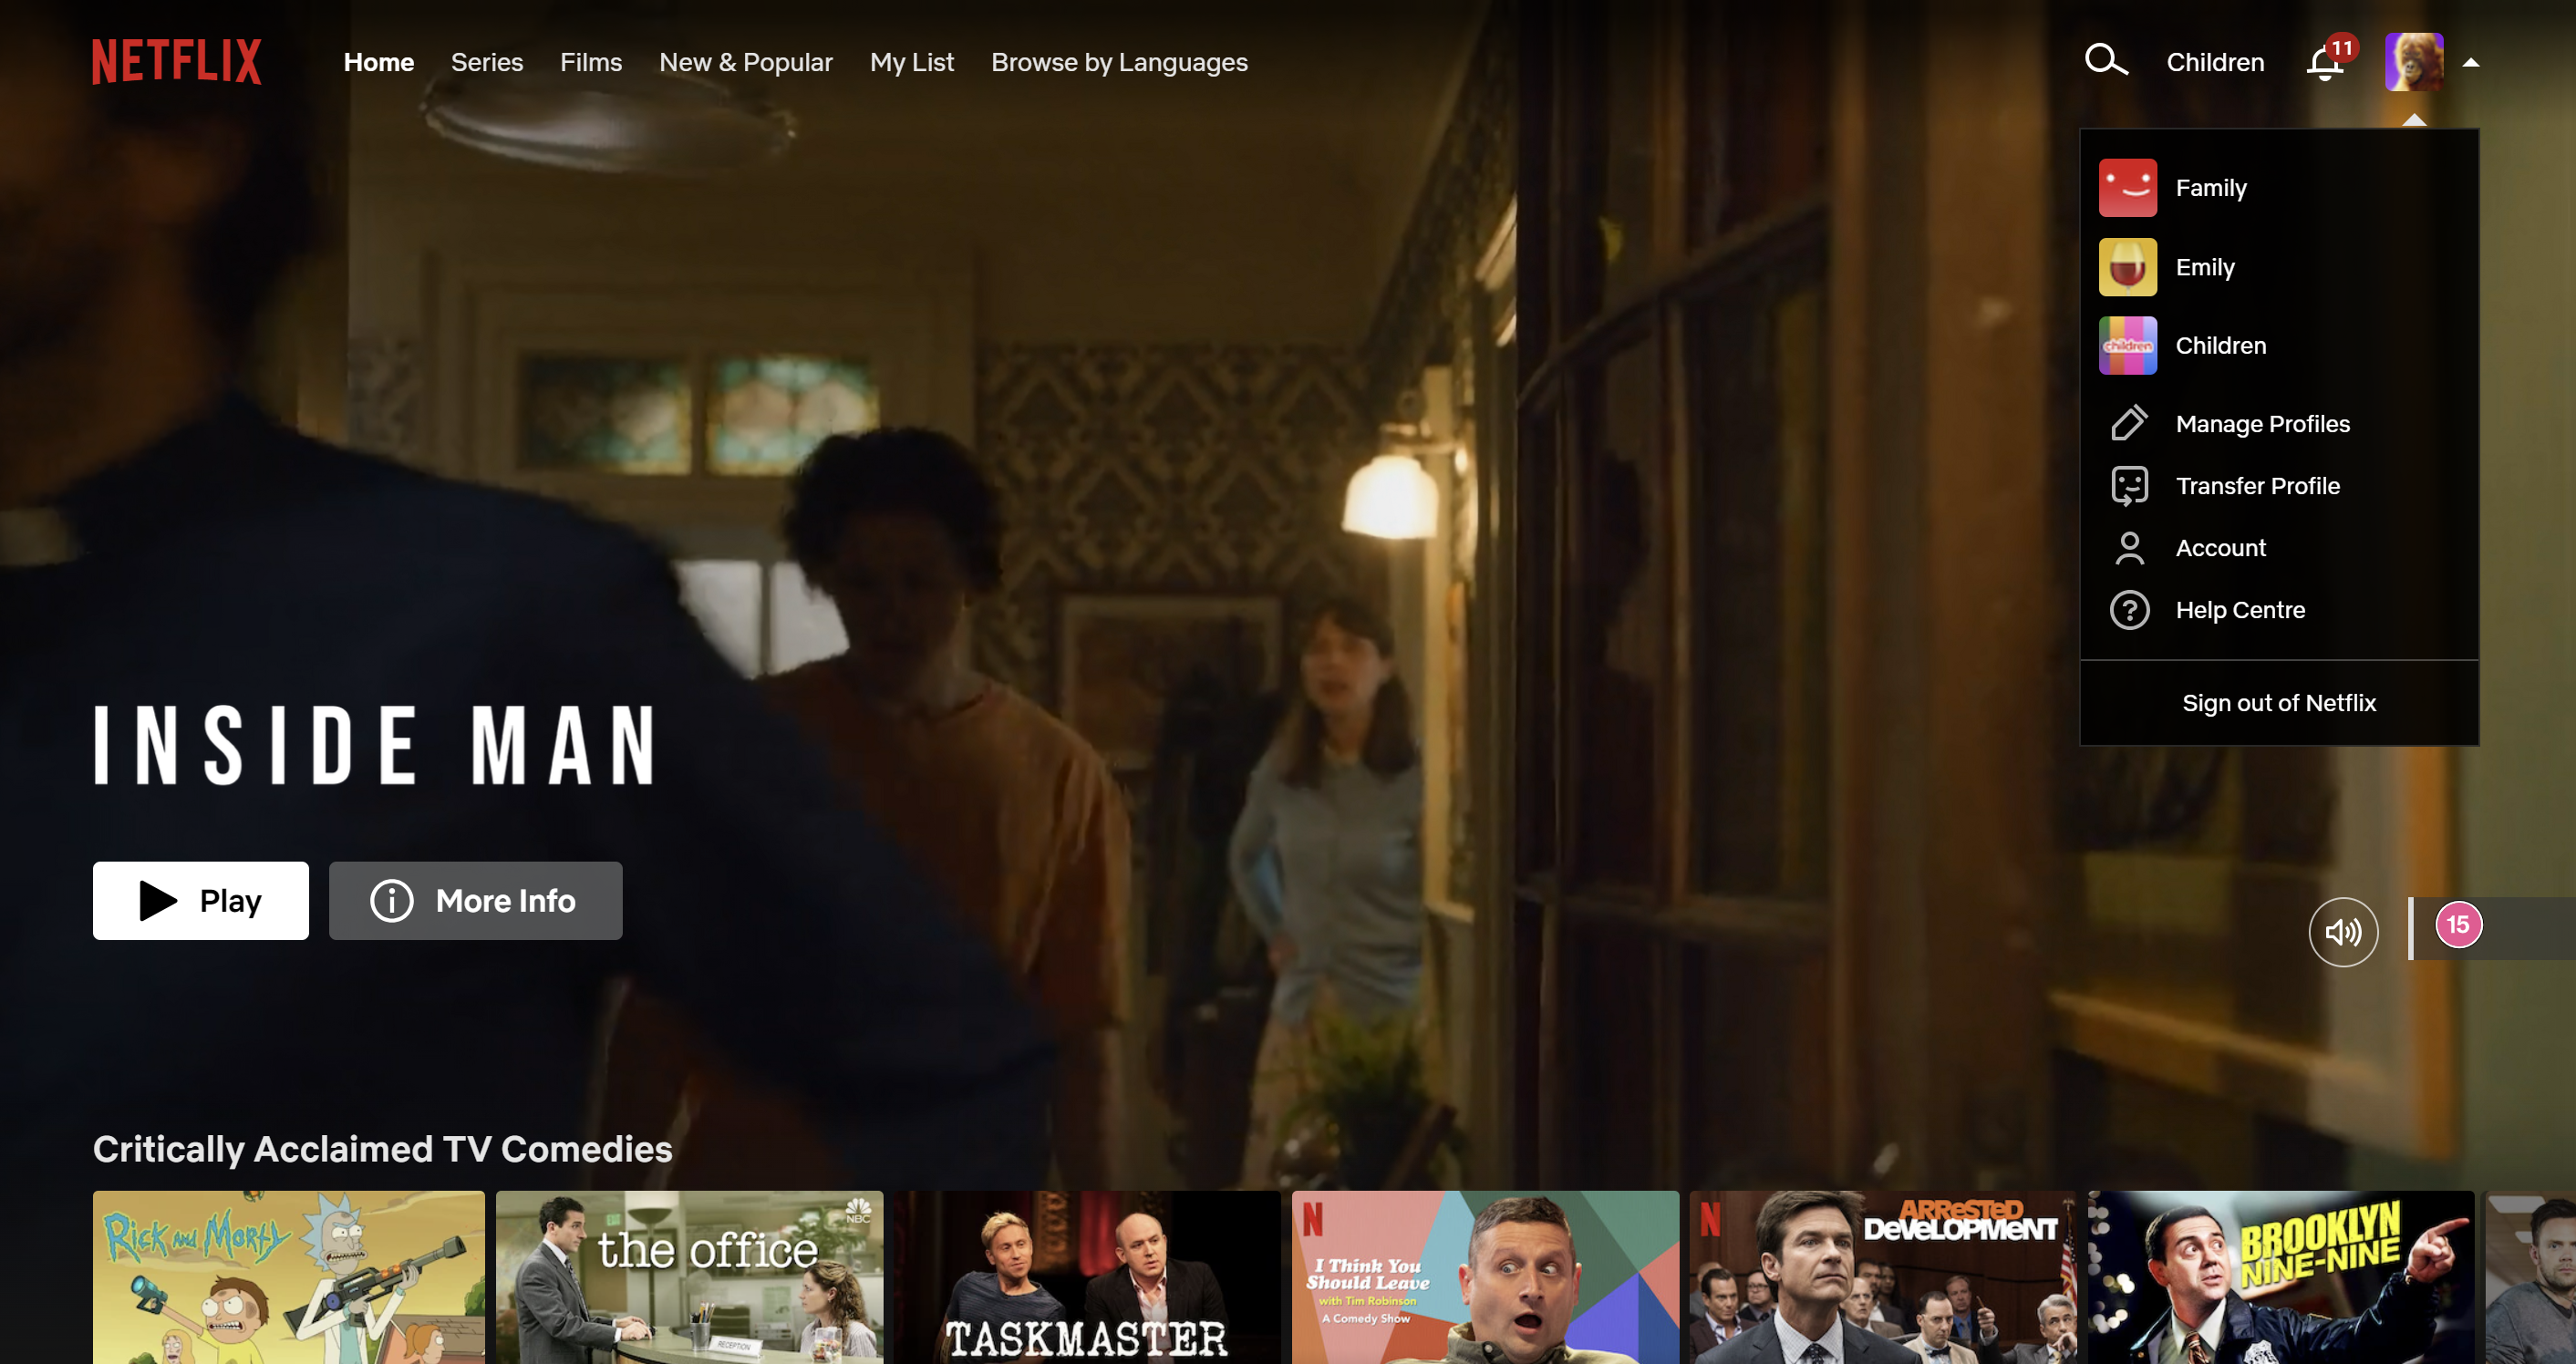
In the upper right-hand corner, click on your profile picture.

-
Step
3Click on Account
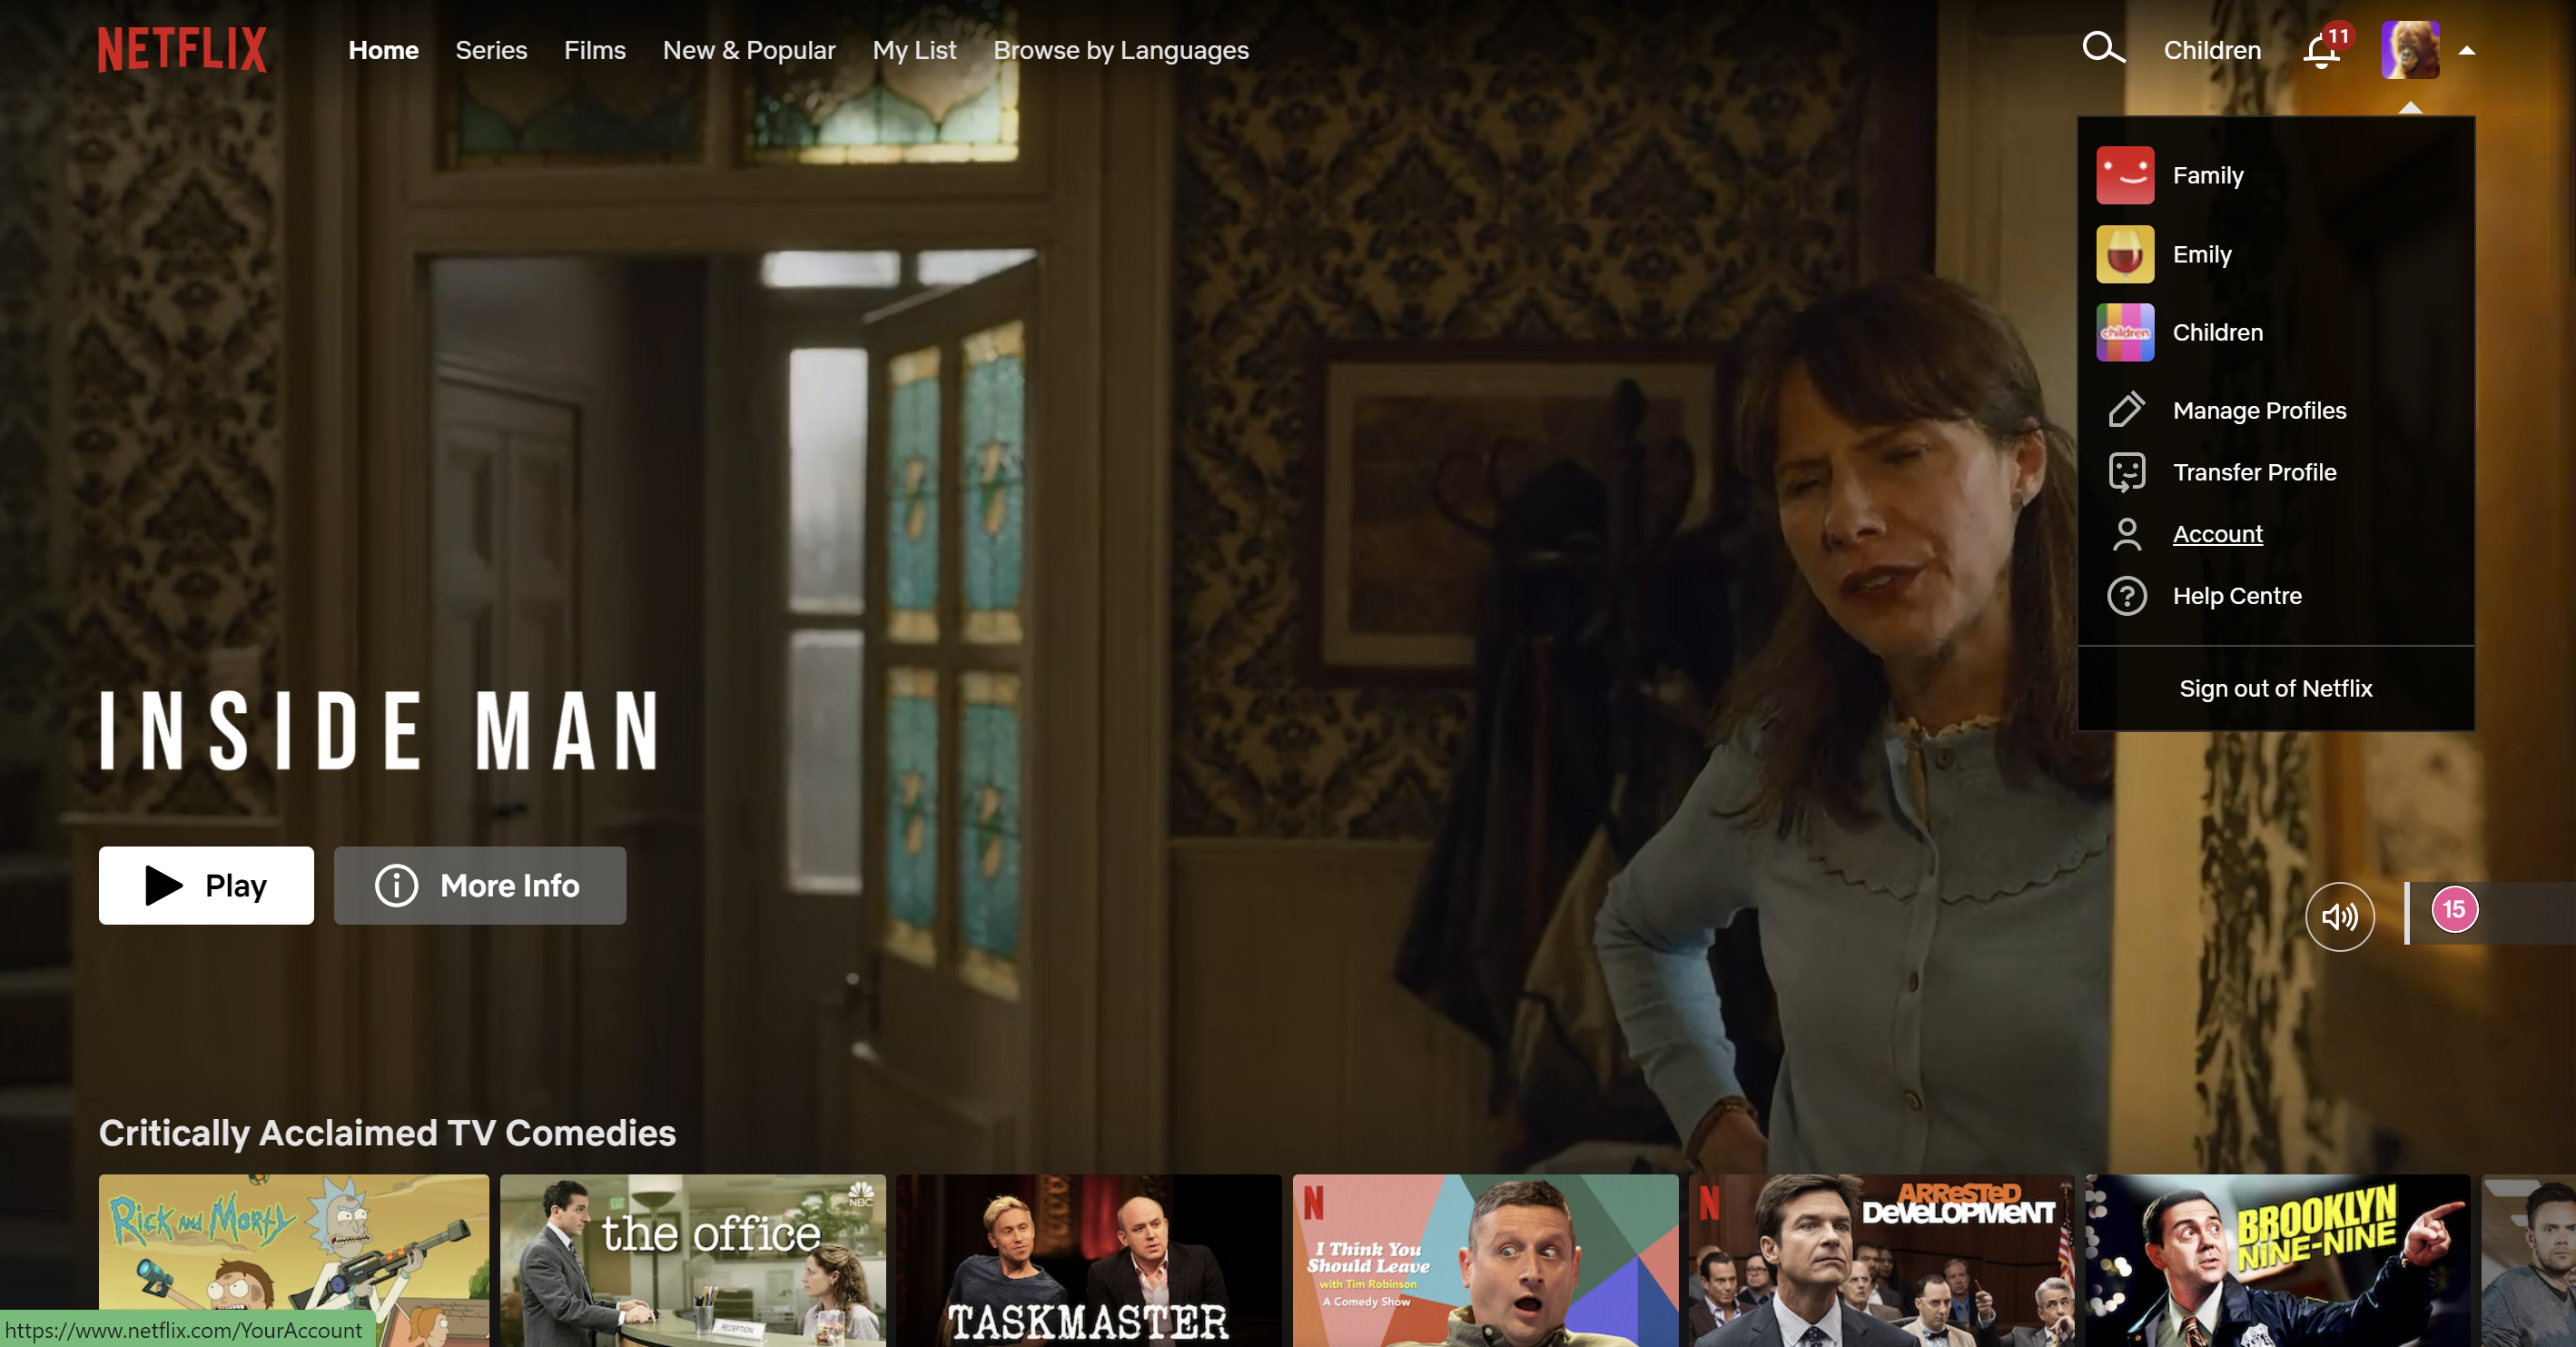
From the drop-down menu presented, click on the Account button.

-
Step
4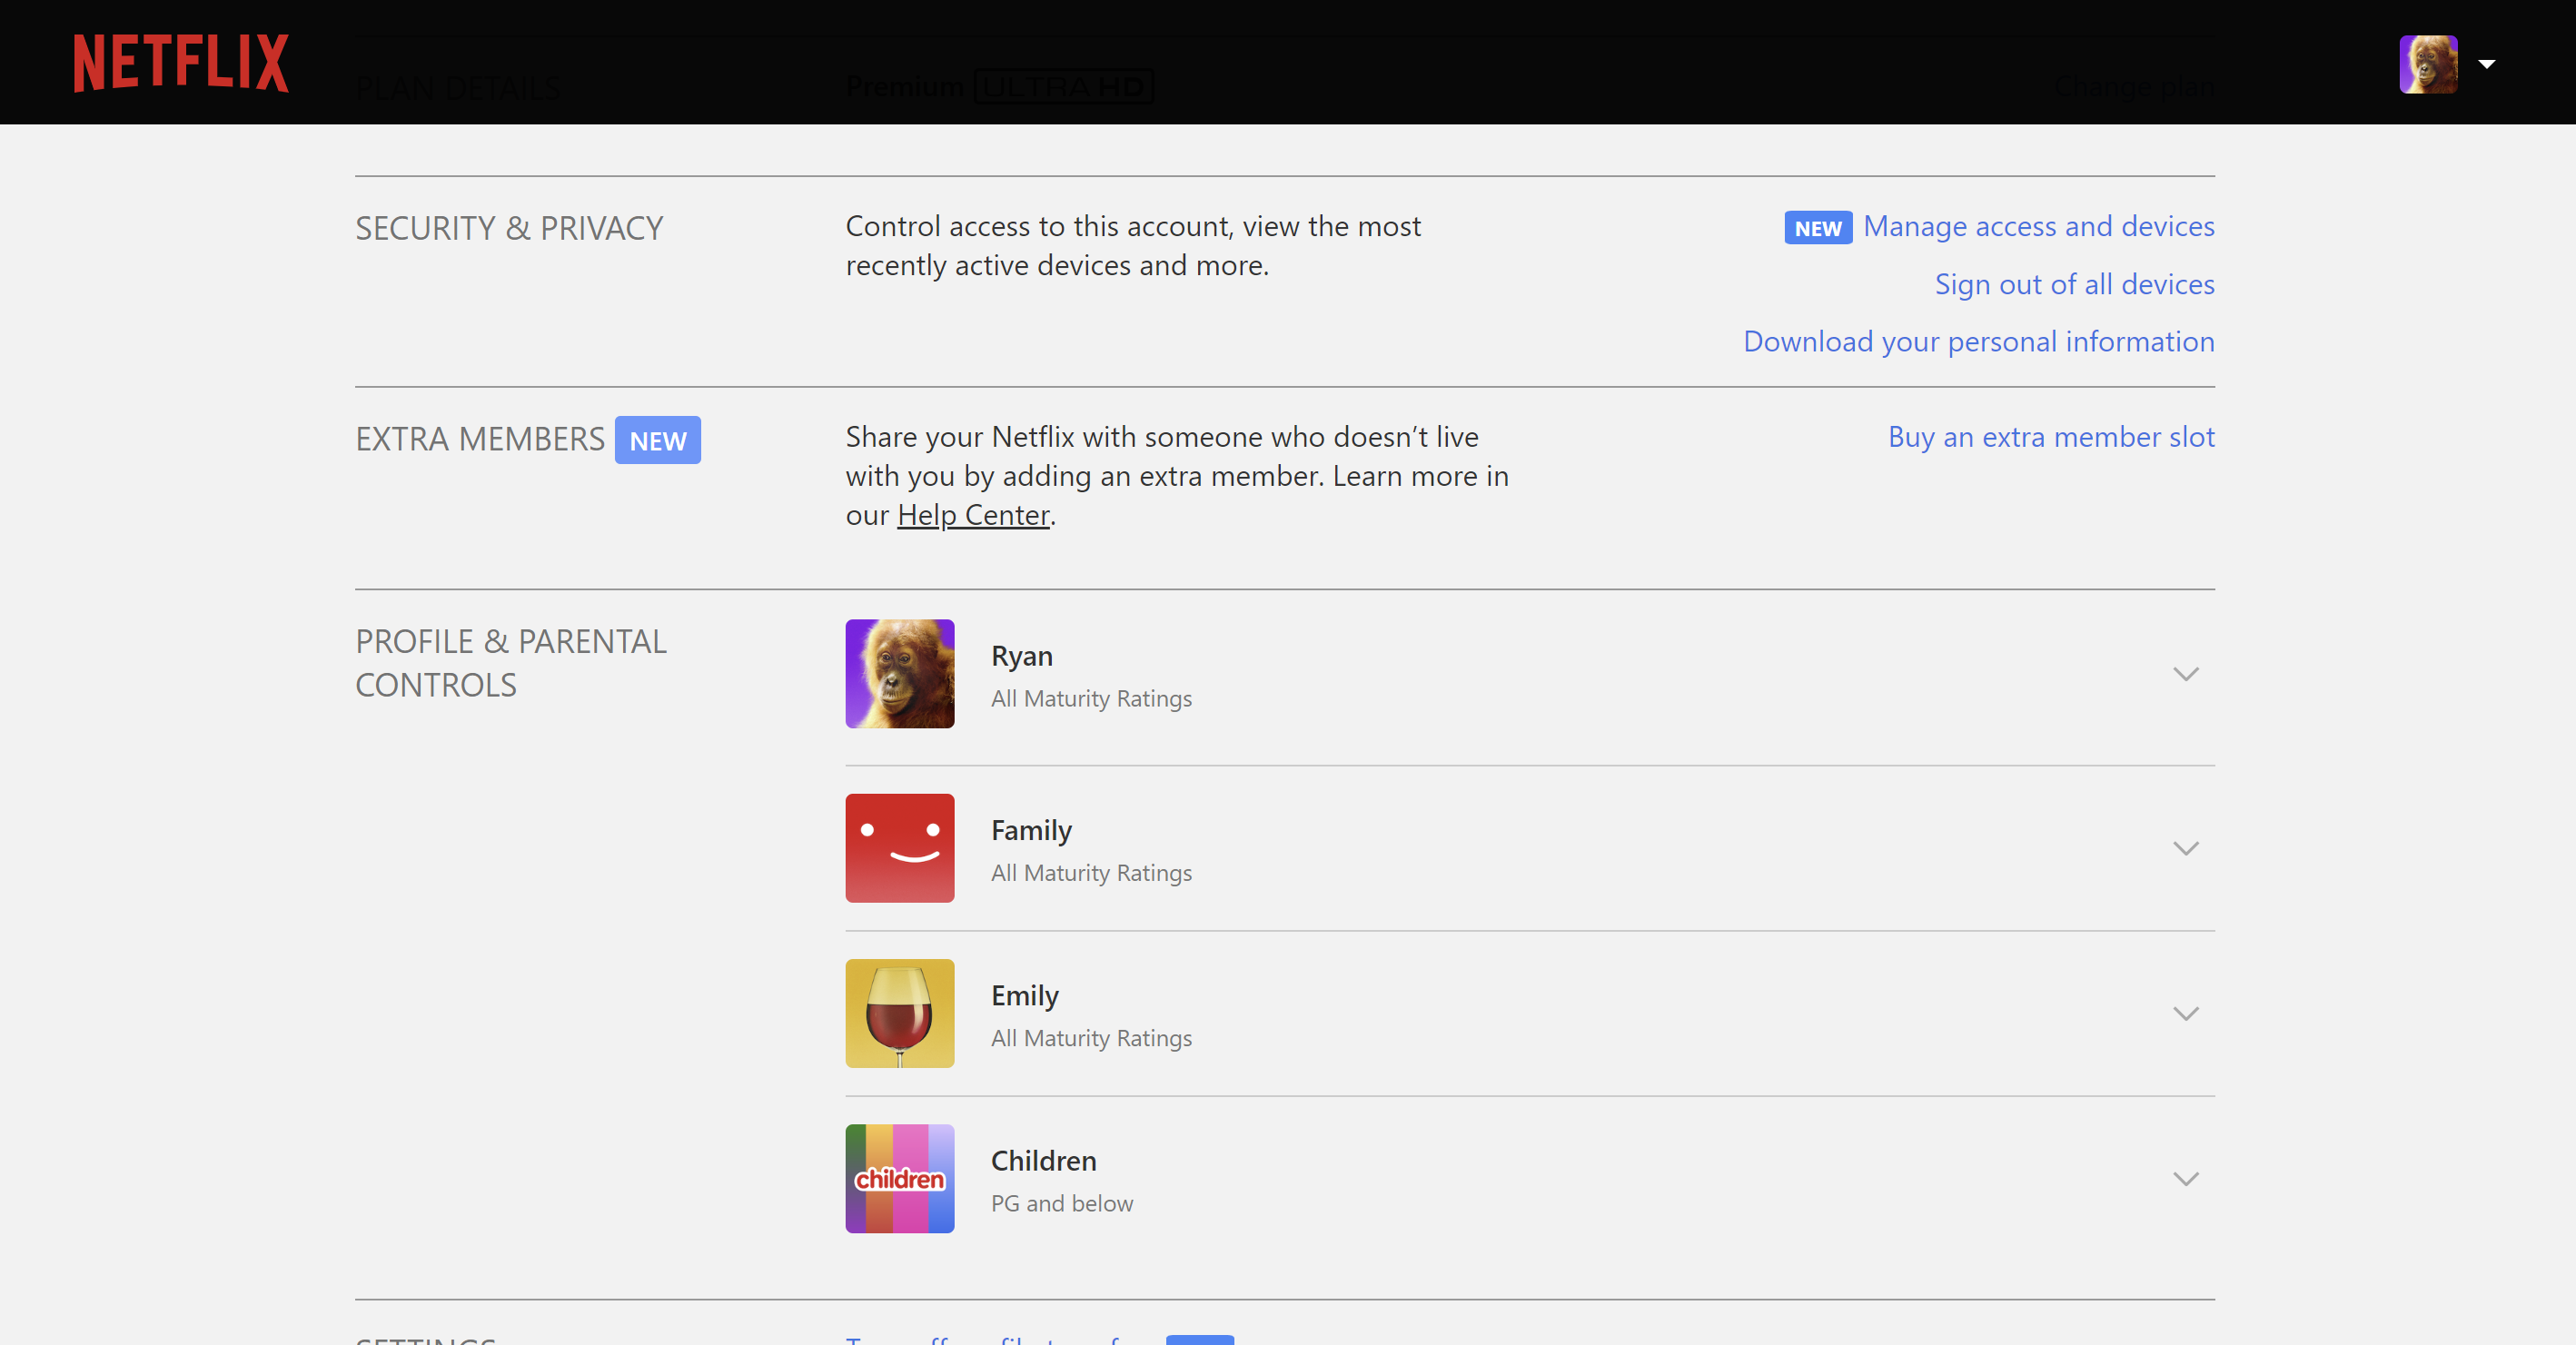
Scroll down and click on the Buy an extra member slot button. It sits under the Extra Members subsection.

-
Step
5Click Next
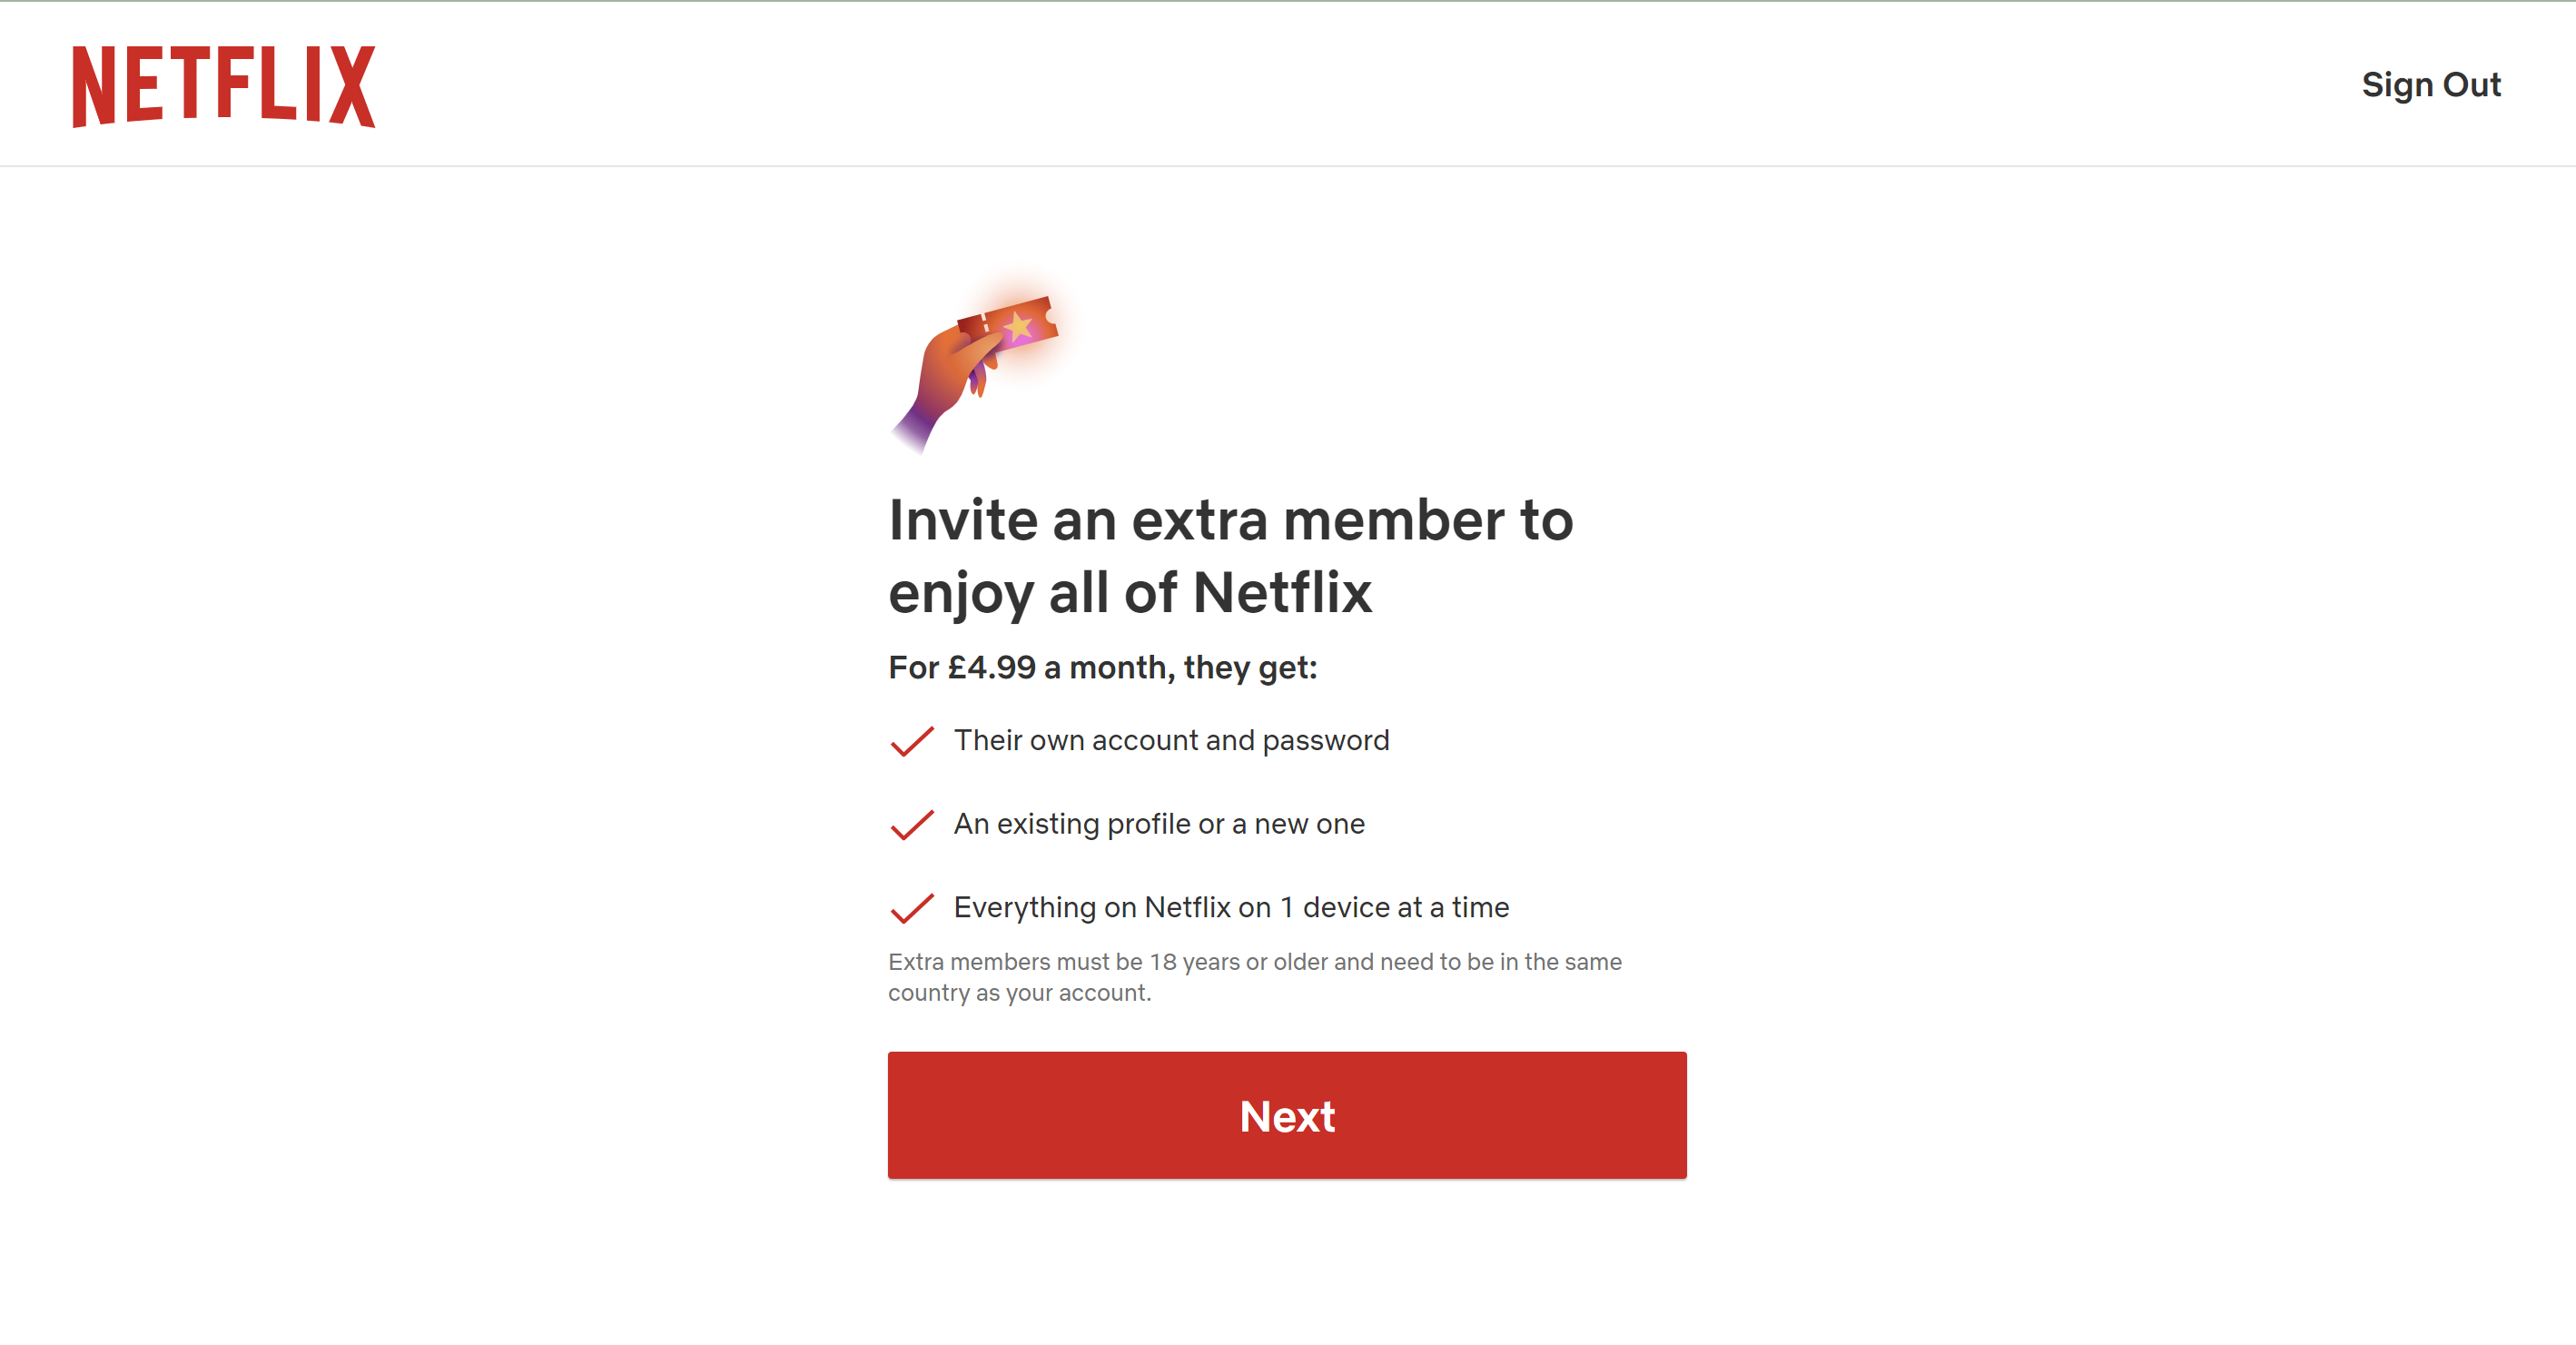
Click on the Next button to continue.

-
Step
6
Once you have read the pricing options and you are happy to add another member, click on the Start Extra Member button.

-
Step
7Click Next

Click on the Next button.

-
Step
8Enter the name and email address of your extra member
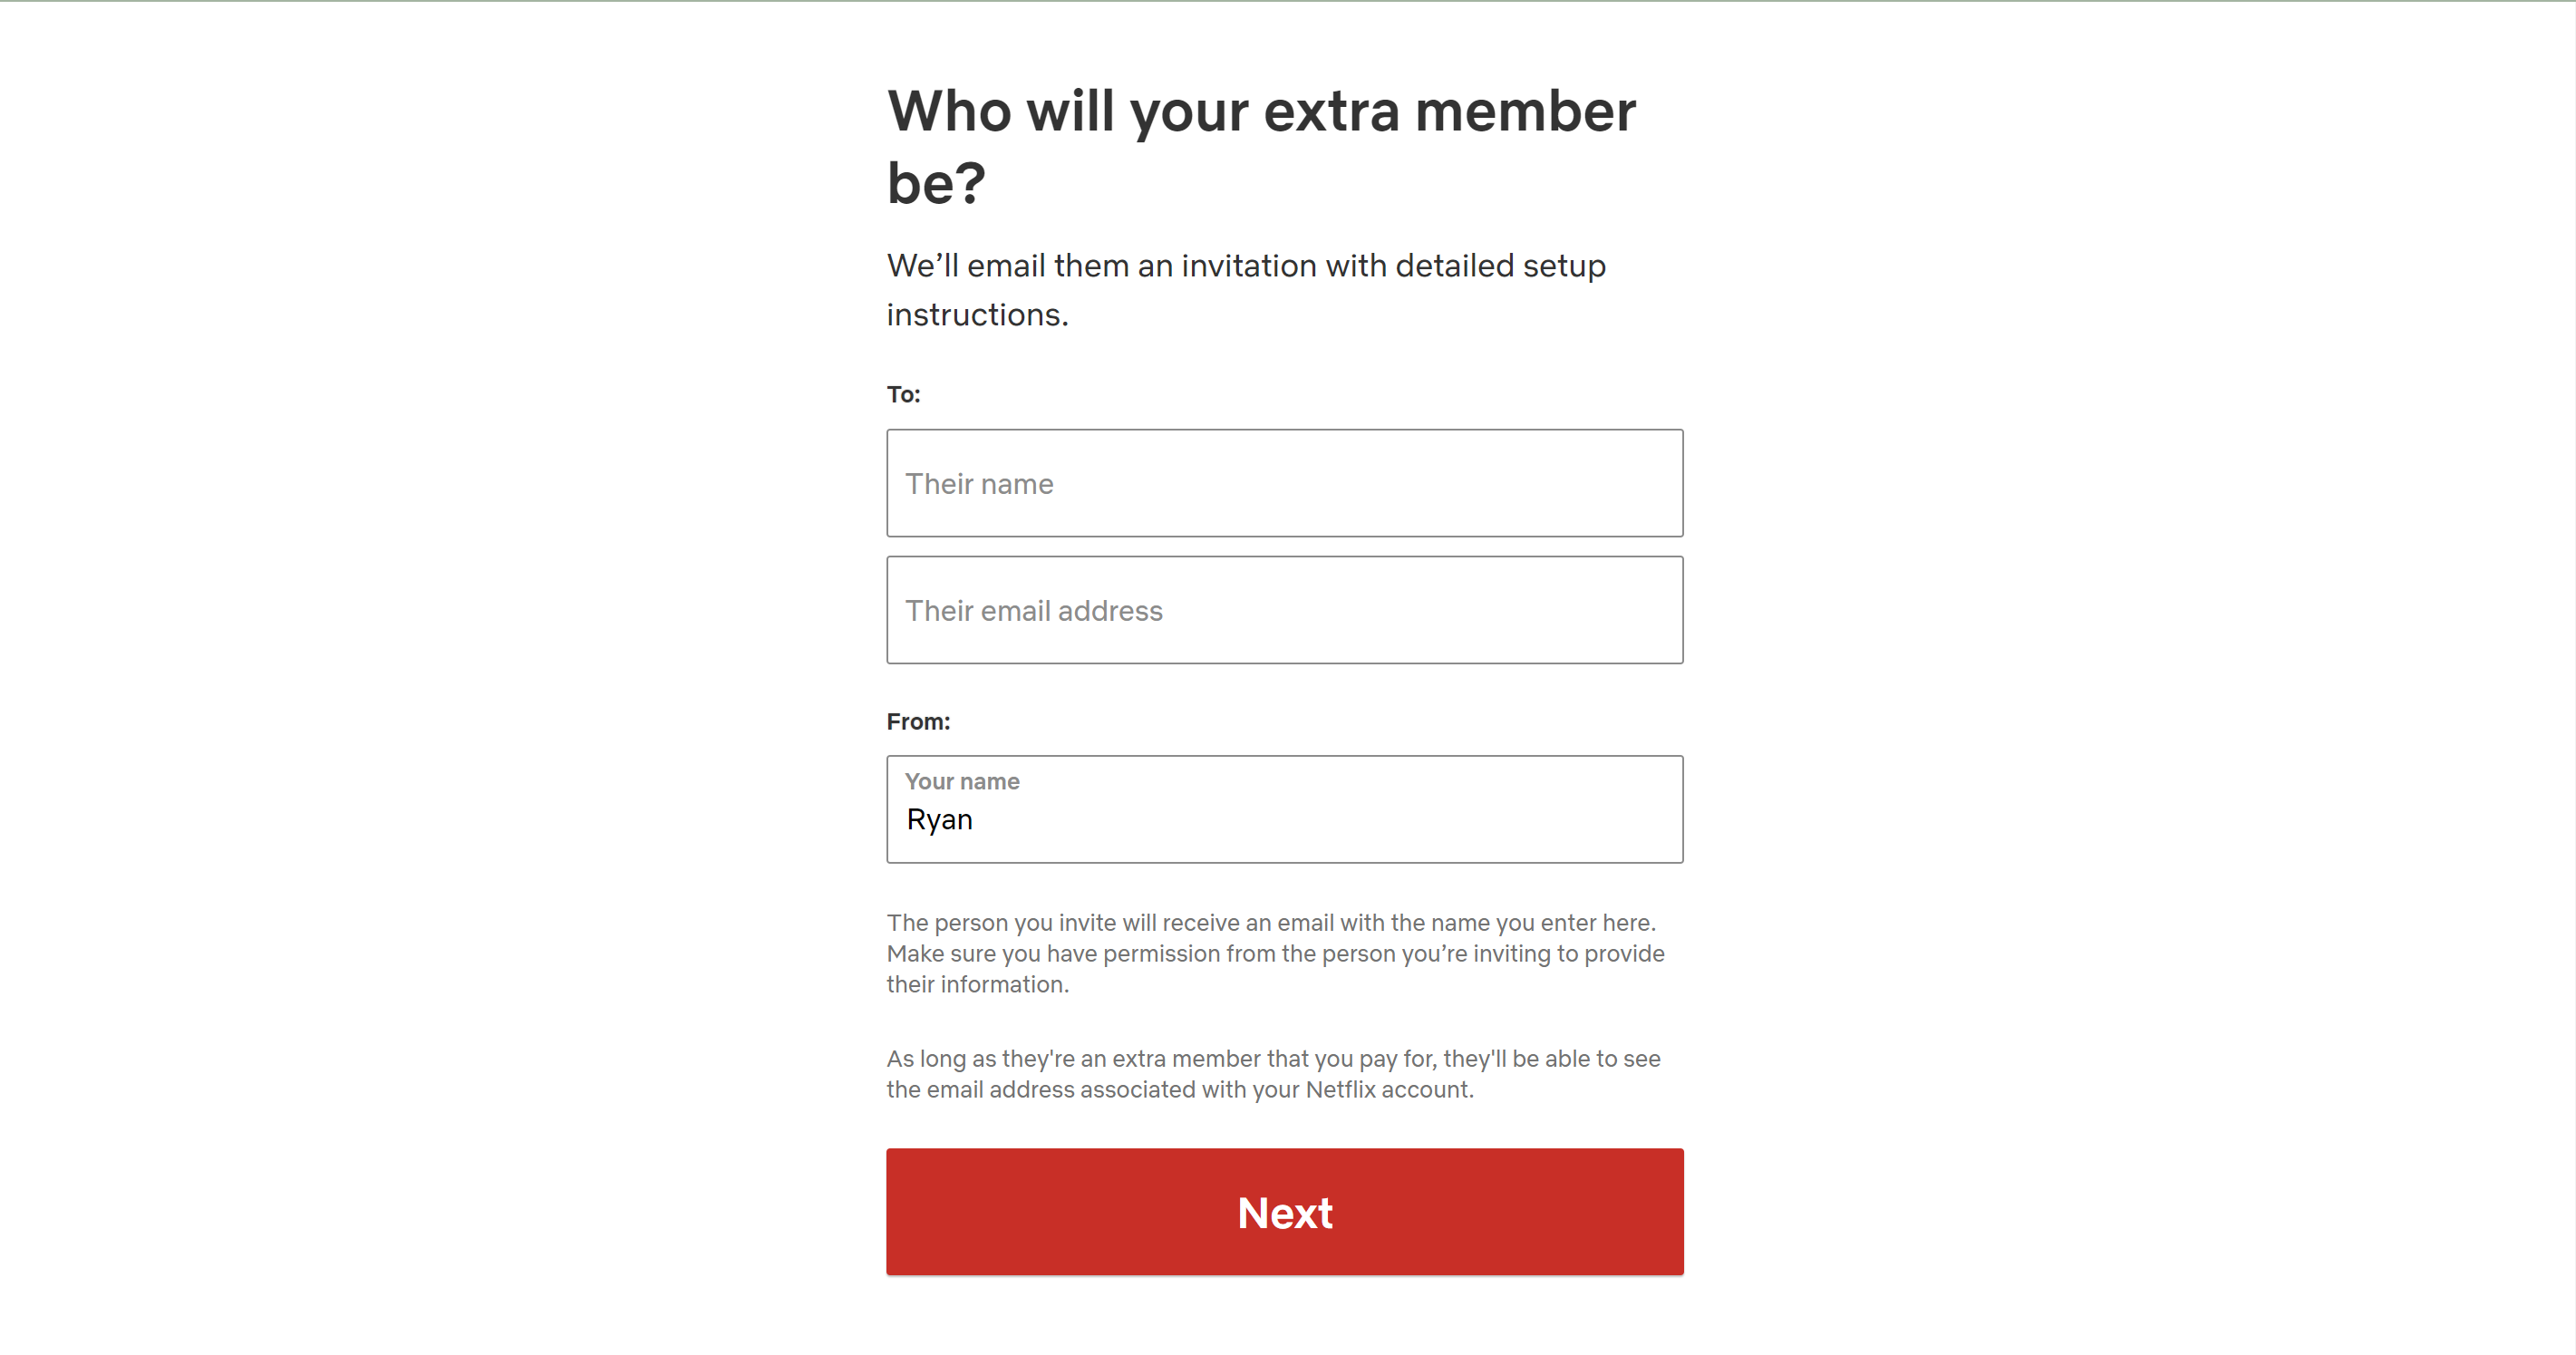
Enter the name and email address of the person you want to add to your account.

-
Step
9Click Next

Once you have entered the correct details for your extra member, click on Next.

-
Step
10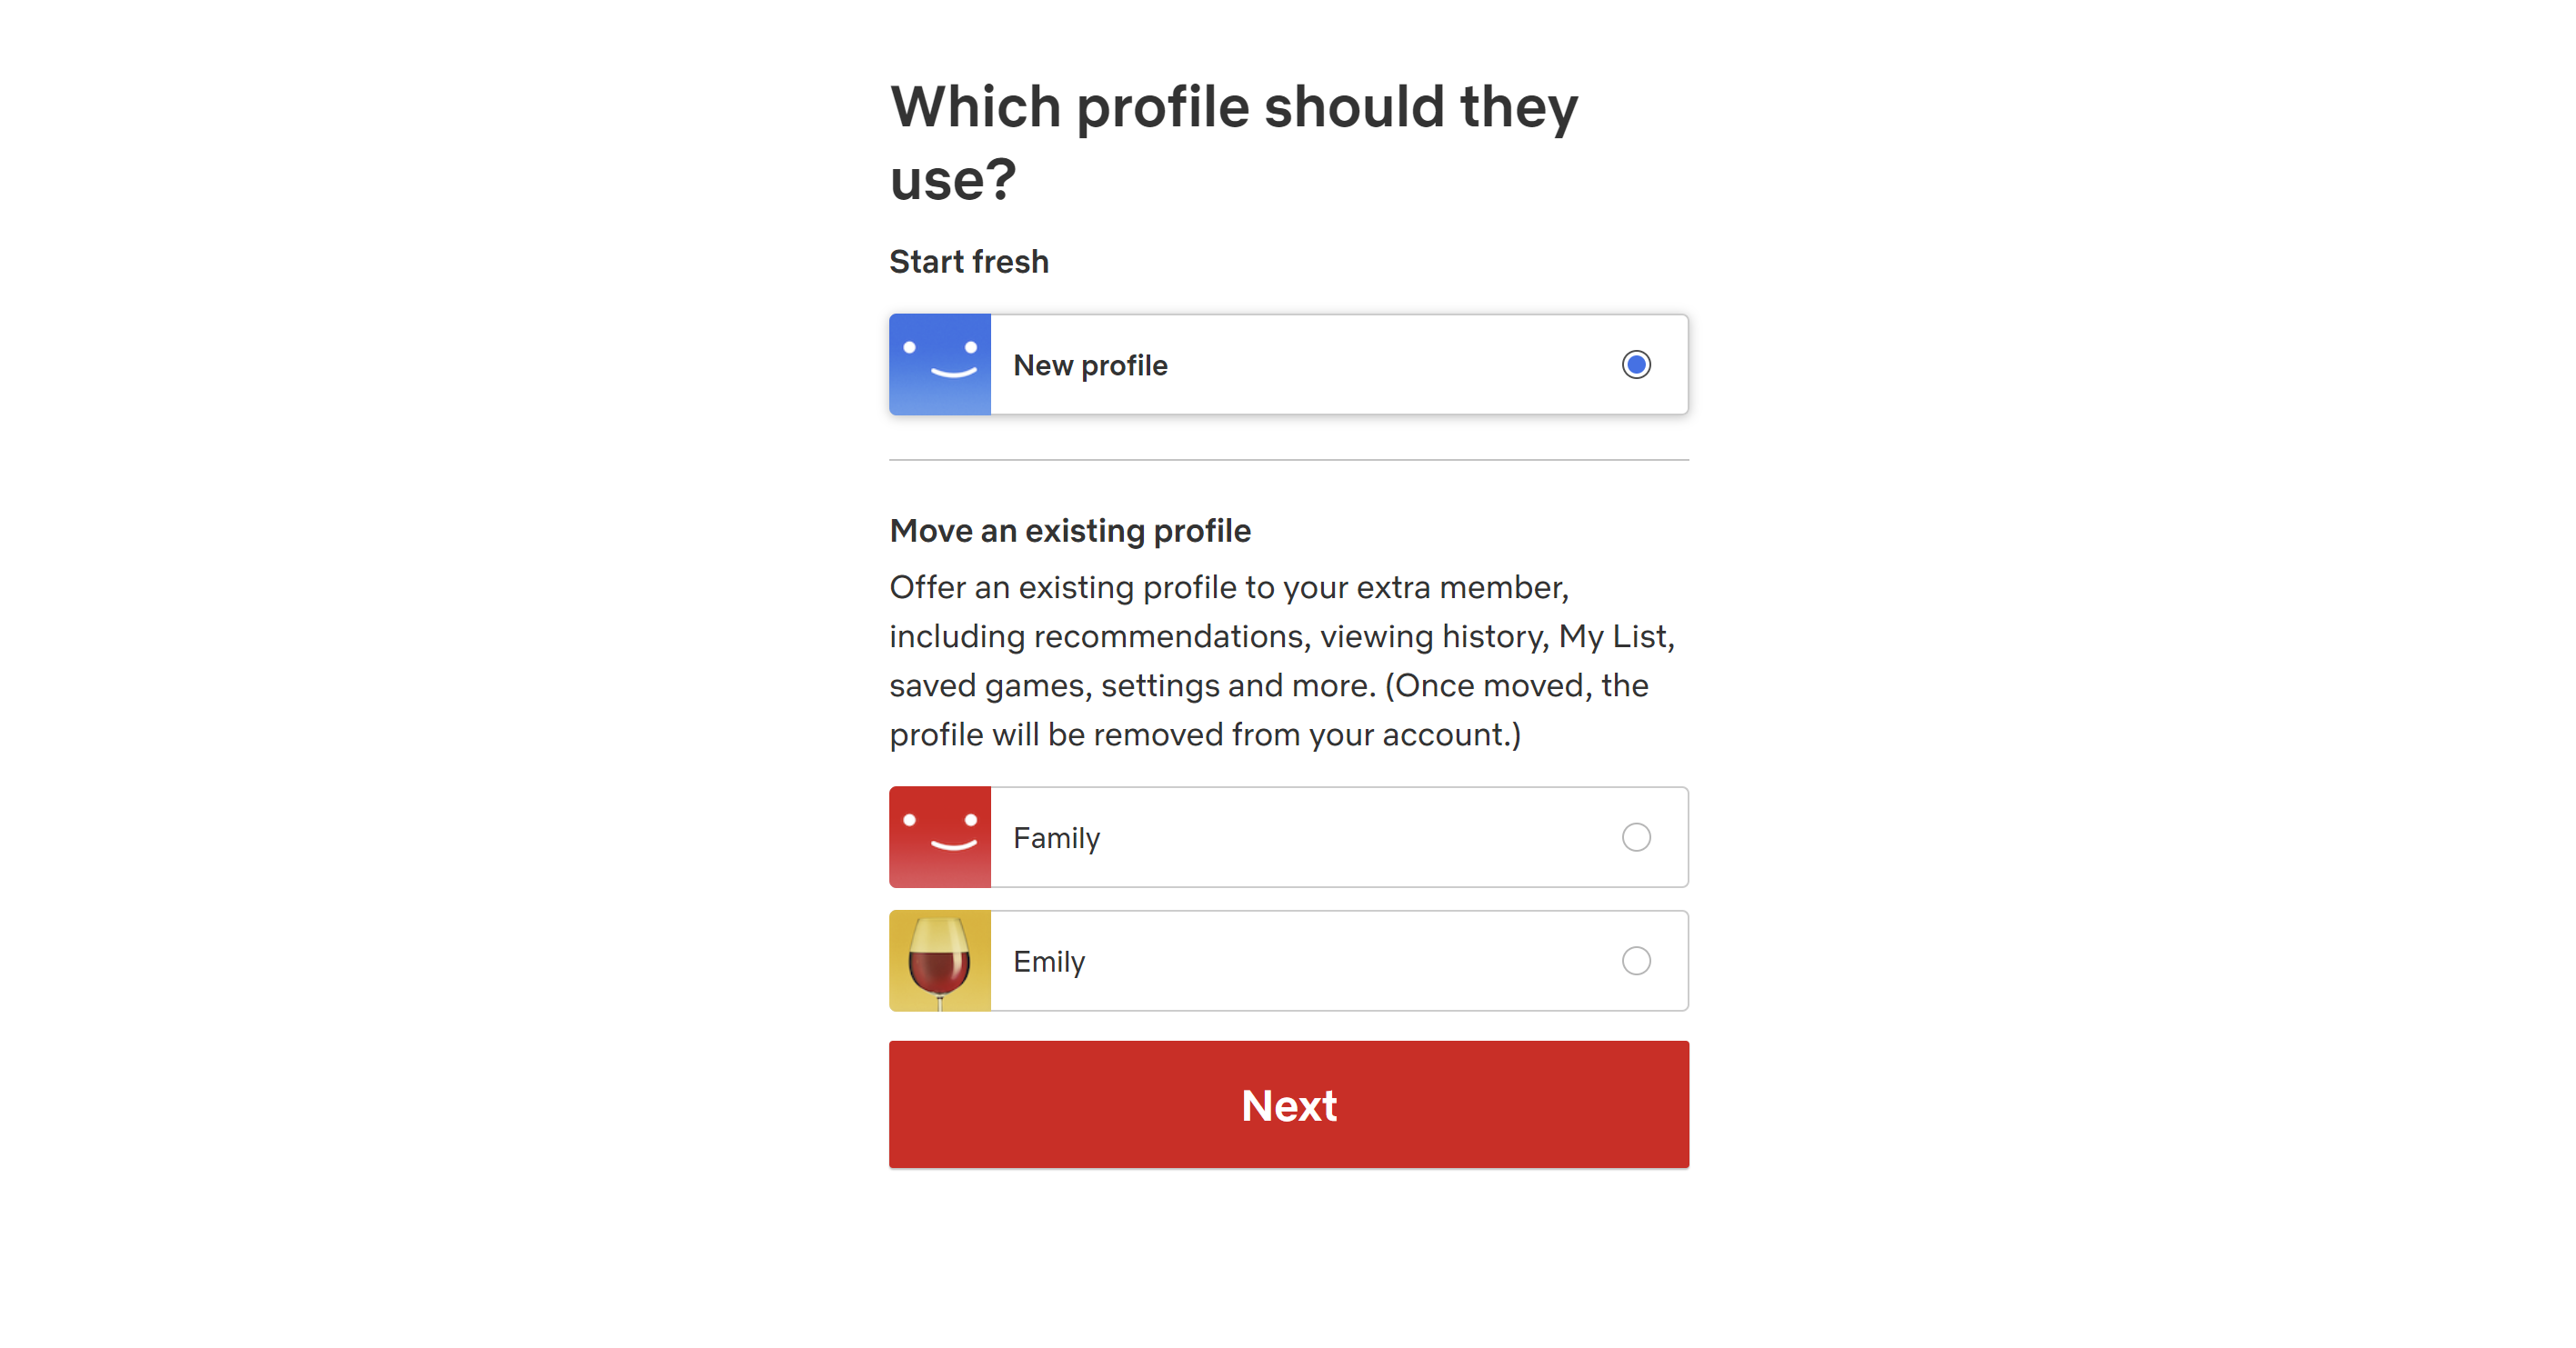
You can now choose if you want your extra member to share an existing profile or if you want to create a profile for them. Once you have decided, click Next.

-
Step
11Go back to Netflix
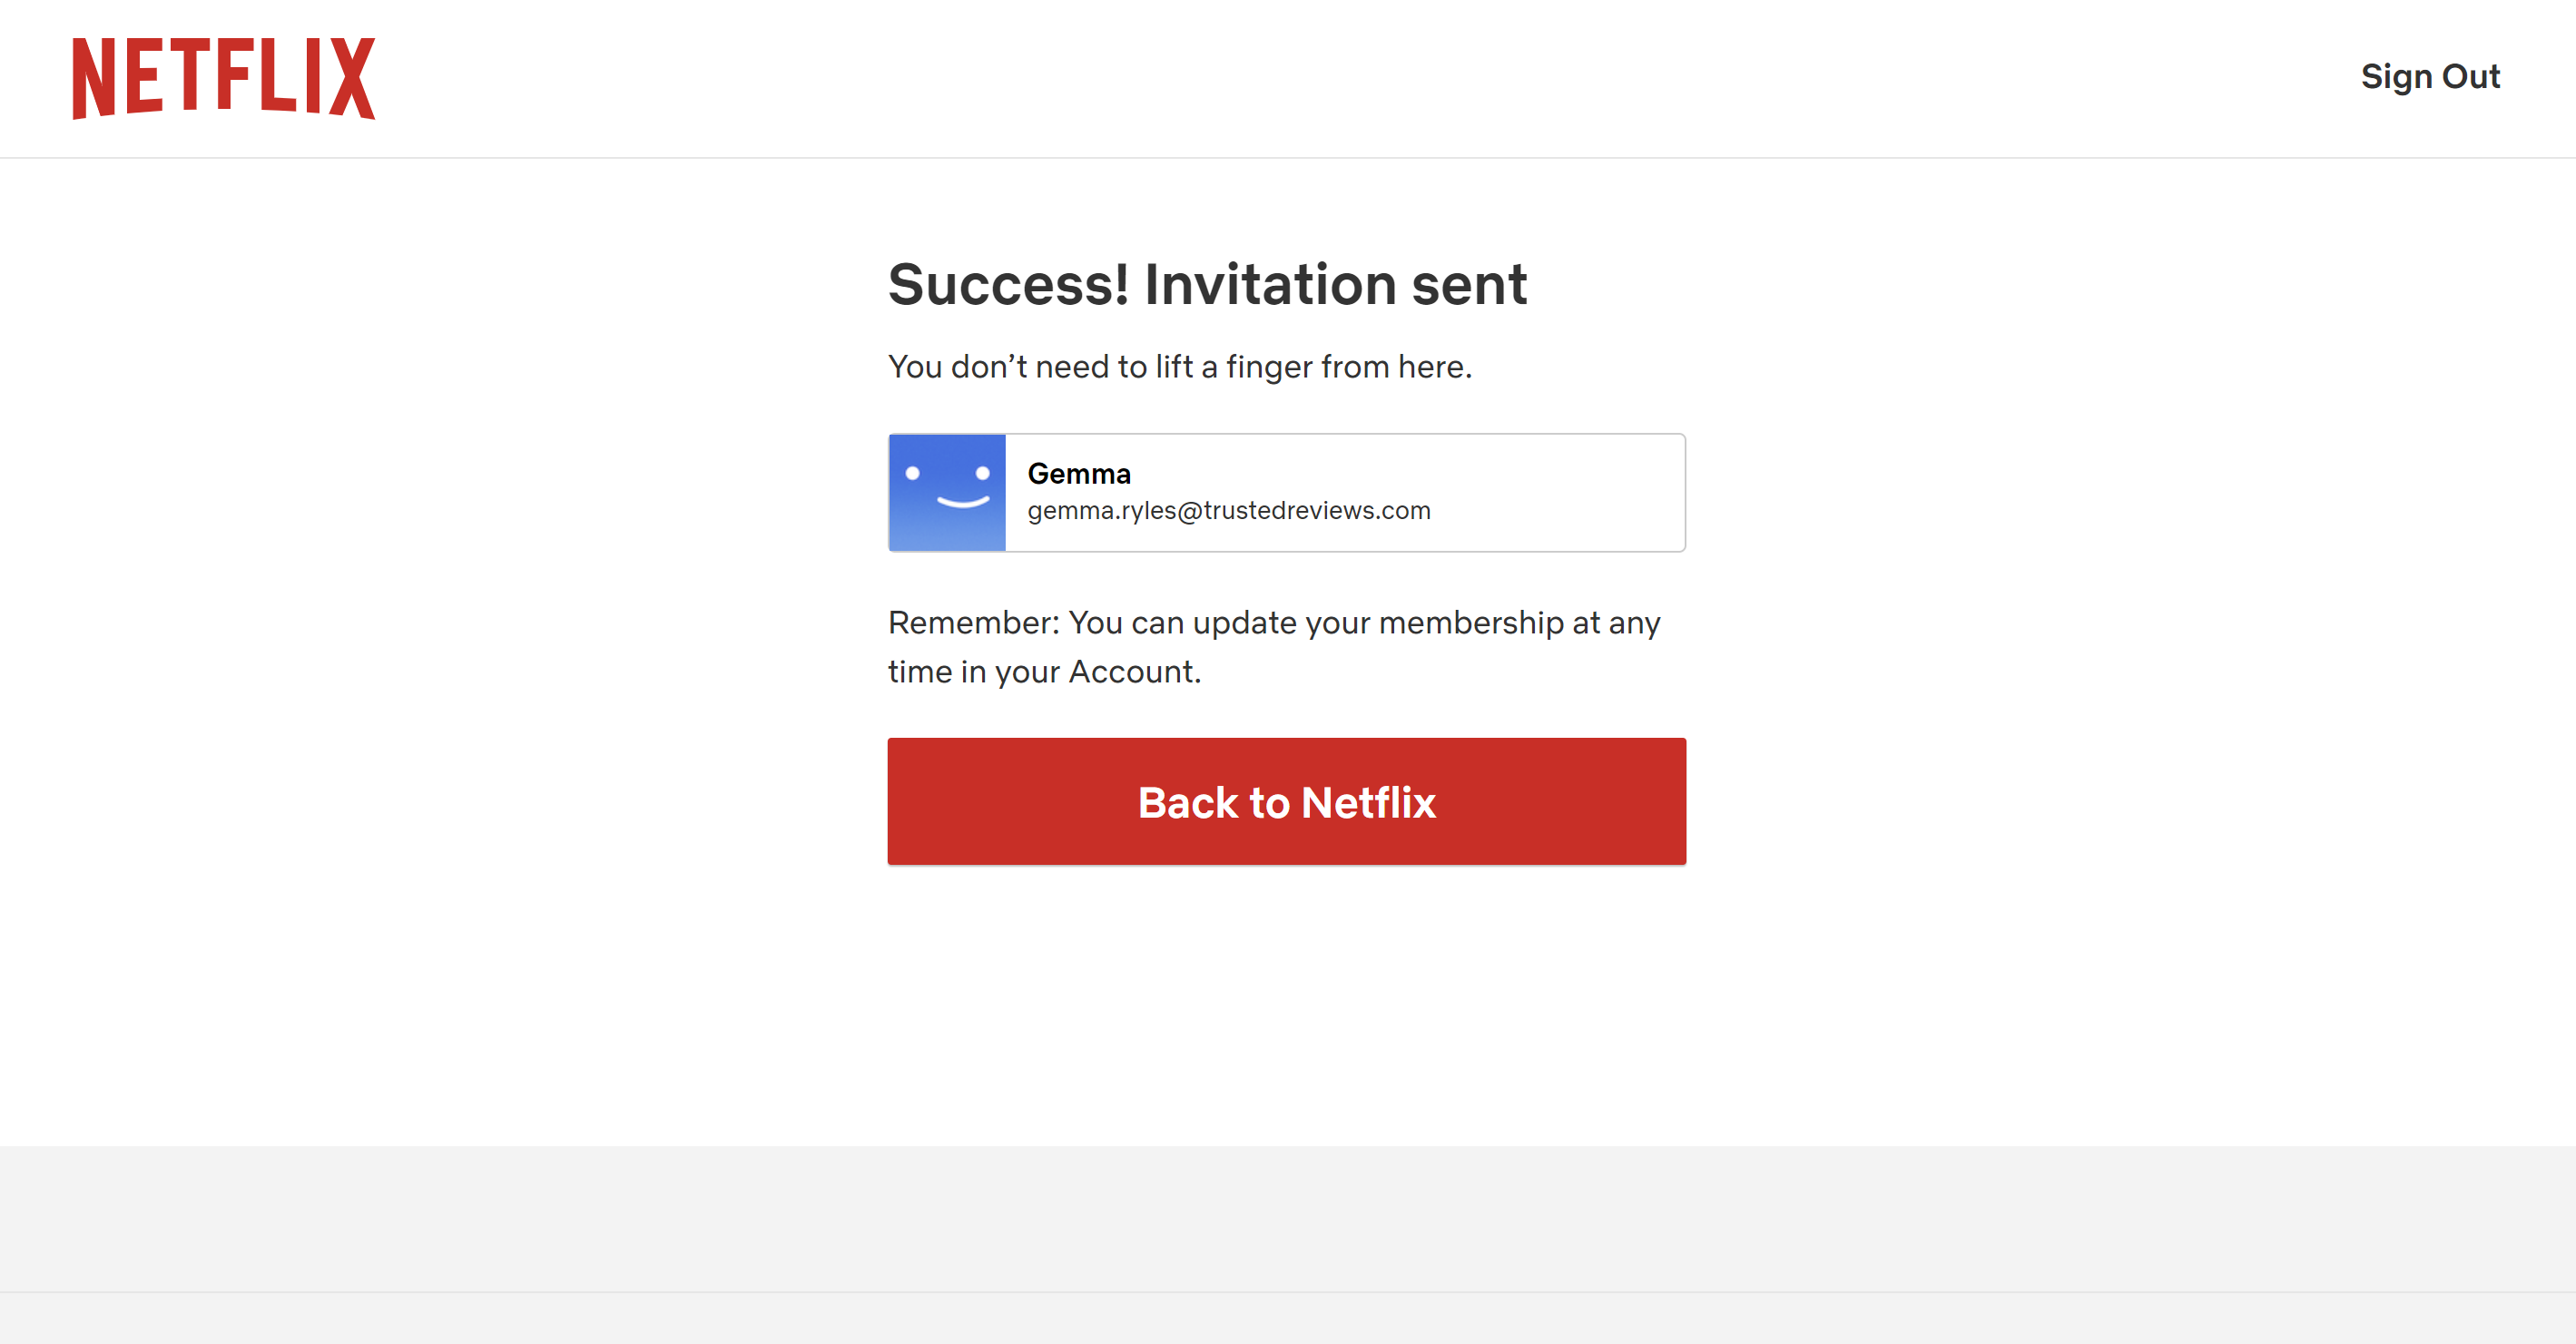
Click on the ‘Back to Netflix’ button to finish the process. You will need to wait for your extra member to accept your invite before they will appear on your Netflix account.

Troubleshooting
Standard Netflix members can add one extra member while Premium Netflix members can add up to two extra members.
Extra members can be added to both Standard and Premium memberships for £4.99/$7.99/€5.99.
Netflix uses your IP address and device information to determine whether you’re using your Netflix account at your primary location. This means that Netflix may become confused if you’re using a VPN while using your account at home.
At the time of writing, you cannot add extra members to your account if you are on Netflix’s cheapest ad-based plan. If you need to add an extra member to your account, then you’ll need to upgrade to at least a Standard membership.
A Standard membership costs £10.99/$15.49/€13.99, while a Premium membership will set you back £17.99/$22.99/€19.99.
Once you’ve followed the above steps, your extra member or members will receive an email to accept your invite. Once they’ve successfully accepted and followed the steps on their side then you’ll see them on your Netflix account.
Support Techcratic
If you find value in our blend of original insights (Techcratic articles and Techs Got To Eat), up-to-date daily curated articles, and the extensive technical work required to keep everything running smoothly, consider supporting Techcratic with Bitcoin. Your support helps me, as a solo operator, continue delivering high-quality content while managing all the technical aspects, from server maintenance to future updates and improvements. I am committed to continually enhancing the site and staying at the forefront of trends to provide the best possible experience. Your generosity and commitment are deeply appreciated. Thank you!
Bitcoin Address:
bc1qlszw7elx2qahjwvaryh0tkgg8y68enw30gpvge
Please verify this address before sending any funds to ensure your donation is directed correctly.
Bitcoin QR Code
Your contribution is vital in supporting my efforts to deliver valuable content and manage the technical aspects of the site. To donate, simply scan the QR code below. Your generosity allows me to keep providing insightful articles and maintaining the server infrastructure that supports them.

Privacy and Security Disclaimer
- No Personal Information Collected: We do not collect any personal information or transaction details when you make a donation via Bitcoin. The Bitcoin address provided is used solely for receiving donations.
- Data Privacy: We do not store or process any personal data related to your Bitcoin transactions. All transactions are processed directly through the Bitcoin network, ensuring your privacy.
- Security Measures: We utilize industry-standard security practices to protect our Bitcoin address and ensure that your donations are received securely. However, we encourage you to exercise caution and verify the address before sending funds.
- Contact Us: If you have any concerns or questions about our donation process, please contact us via the Techcratic Contact form. We are here to assist you.
Disclaimer: As an Amazon Associate, Techcratic may earn from qualifying purchases.


![Japanese Movie – The X From Outer Space (Uchu Dai Kaijyu Girara) [Japan BD] SHBR-263](https://techcratic.com/wp-content/uploads/2024/11/81rV3BDVGJL._SL1024_-360x180.jpg)


