


![SABRENT [3-Pack 22AWG Premium 6ft USB-C to USB A 3.0 Sync and Charge Cables [Black]…](https://techcratic.com/wp-content/uploads/2025/08/81SQ13LNwfL._SL1500_-360x180.jpg)


staff@slashgear.com (Marinel Sigue)
2025-04-26 10:45:00
www.slashgear.com
Perhaps one of the most common and useful USB gadgets for PC users is a flash drive. After all, nothing can beat the convenience of having your important files easily accessible anywhere but without the hassle of carrying a heavy and bulky laptop or SSD/HDD. The thing about external drives, though, is that they can be prone to data loss or file corruption if you’re not careful.
Advertisement
Sure, Windows is already allowing users to skip the Safely Remove Hardware process when using a USB flash drive or Thunderbolt external drive, meaning you can just unplug your drives without any consequences at any given time. This has been the default policy since Windows 10, but if you’re still anxious about potentially losing your files or corrupting your drive, it’s still a good idea to safely eject it from your computer before removing it. But what exactly is this safe way and what should you do if it fails?
How to safely remove an external USB drive from your PC
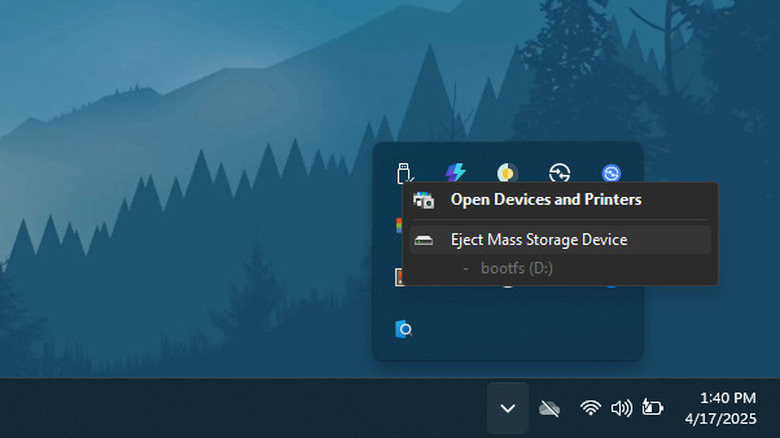
The quickest way to safely eject a USB flash drive from your Windows machine is from the system tray. Once you plug in your external drive, a USB icon with a checkmark in the bottom right corner will automatically appear on your system tray. All you have to do to eject the USB stick is to right-click on this icon and select Eject [device name] from the menu — that’s all there is to it. You should then see a Windows Explorer pop-up on the bottom-right of your screen, saying you can now safely pull out the thumb drive.
Advertisement
If there’s no USB icon on your system tray, click on the up arrow to expand the hidden icons panel. It might be located there instead. If the USB drive is still not showing up on your PC, try to fix it first. Then, you can add the USB icon to the system tray by following these steps:
- Right-click on an empty space on your taskbar.
- Go to Taskbar settings.
- Choose Other system tray icons.
- Find the entry for Safely Remove Hardware and Eject Media.
- Toggle it on.
- Check if the USB icon shows up on your system tray.
Besides the system tray, you can readily eject your flash drive from Settings too. Here’s what you need to do:
- Navigate to Settings > Bluetooth & devices > Devices.
- Look for your USB device name under Other devices and click on it.
- Hit Remove to eject it.
Feel free to unplug the USB stick once you hear the eject sound and the drive is removed from the Other devices list.
What to do if your USB drive can’t be safely ejected
While you can normally remove a USB stick from your Windows machine without a hitch, it’s also not uncommon to encounter errors when ejecting it. One of the most common errors is the “device is currently in use” pop-up, which can turn up even though you’re no longer editing a document on the drive or transferring files to it. To fix this issue and safely eject your flash drive, here are a few solutions to try:
Advertisement
- Turn off your antivirus program. It might be scanning your files and preventing Windows from safely ejecting the thumb drive.
- Sign out of Windows and log back in. Close all your applications. Then, press Ctrl + Alt + Del and select Sign out. Once you get back to the Sign in page, enter your passcode or password and try ejecting the USB stick again.
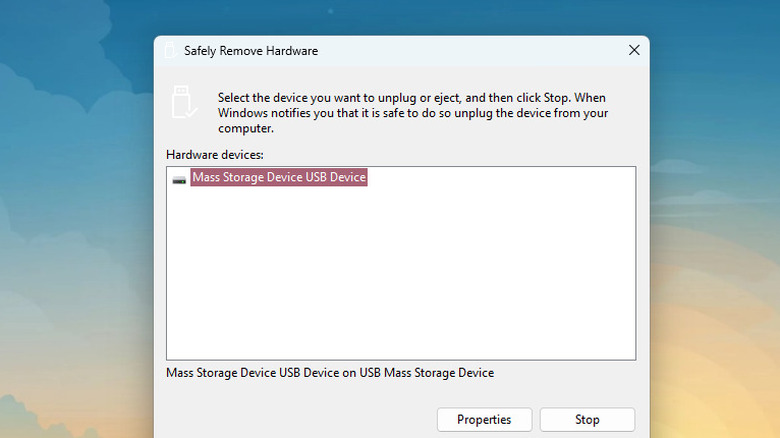
- Remove the USB drive from Disk Management. From the Start menu, search for “disk management” and select the first result that pops up. Then, right-click on the USB drive marked as Removable and choose Eject.
- Use the Run dialog tool. Hit the Windows 11 keyboard shortcut Win + R and enter “RunDll32.exe shell32.dll,Control_RunDLL hotplug.dll” (without quotes) into the dialog box. On the new window that appears, select the USB drive and click on the Stop button.
- Restart Windows Explorer from Task Manager. Open Task Manager and locate Windows Explorer (use the search bar if you have many other programs running). Click on Windows Explorer from the list and press Restart task at the top.
If all else fails, try restarting your PC. It might just be a temporary glitch.
PULIDIKI Car Cleaning Gel Universal Detailing Kit
Make car cleaning effortless with the PULIDIKI Car Cleaning Gel Universal Detailing Kit, a simple yet effective solution for keeping your vehicle spotless. With over 89,741 ratings and an impressive 4.1-star average, it’s no wonder this kit is a highly rated Amazon Best Seller.
Loved by over 40,000 buyers in just the past month, it’s an unbeatable deal for only $6.99. Perfect for cleaning those hard-to-reach areas, this detailing gel is a must-have for car enthusiasts. Order now for just $6.99 at Amazon!
Help Power Techcratic’s Future – Scan To Support
If Techcratic’s content and insights have helped you, consider giving back by supporting the platform with crypto. Every contribution makes a difference, whether it’s for high-quality content, server maintenance, or future updates. Techcratic is constantly evolving, and your support helps drive that progress.
As a solo operator who wears all the hats, creating content, managing the tech, and running the site, your support allows me to stay focused on delivering valuable resources. Your support keeps everything running smoothly and enables me to continue creating the content you love. I’m deeply grateful for your support, it truly means the world to me! Thank you!
|
BITCOIN
bc1qlszw7elx2qahjwvaryh0tkgg8y68enw30gpvge Scan the QR code with your crypto wallet app |
|
DOGECOIN
D64GwvvYQxFXYyan3oQCrmWfidf6T3JpBA Scan the QR code with your crypto wallet app |
|
ETHEREUM
0xe9BC980DF3d985730dA827996B43E4A62CCBAA7a Scan the QR code with your crypto wallet app |


Please read the Privacy and Security Disclaimer on how Techcratic handles your support.
Disclaimer: As an Amazon Associate, Techcratic may earn from qualifying purchases.


