


![for Tesla Model 3 2025 Dashboard Cover,[Anti-Glare and Dustproof] Suede Dashboard Pad…](https://techcratic.com/wp-content/uploads/2025/08/61yHoBc6VfL._AC_SL1500_-360x180.jpg)


2025-08-20 21:14:00
keithclark.co.uk
Lighting
Lighting was by the biggest challenge in this project. I won’t lie, the math nearly broke me, but it was worth the effort because lighting brings an incredible sense of depth and atmosphere an otherwise flat and lifeless environment.
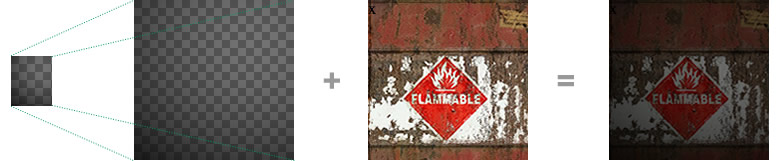
As I mentioned earlier, an object in your average 3D engine is defined by a series of vertices. To calculate lighting these vertices are used to compute a “normal” which can be used to determine how much light will hit the centre point of a surface. This poses a problem when creating 3D objects with HTML elements because this vertex data doesn’t exist. So the first challenge was to write a set of functions to calculate the four vertices (one for each corner) for an element that had been transformed with CSS so that lighting could be calculated. Once that was figured out I began to experiment with different ways to light objects. In my first experiment, I used multiple background-images to simulate light hitting a surface by combining a linear-gradient with an image. The effect uses a gradient that begins and ends with the same rgba value, producing a solid block of colour. Varying the value of the alpha channel allows the underlying image to bleed through the colour block creating the illusion of shading.

To achieve the second darkest effect in the above image I apply the following styles to an element:
element {
    background: linear-gradient(rgba(0,0,0,.8), rgba(0,0,0,.8)), url("texture.png");
}
In practice, these styles are not predefined in a stylesheet, they are calculated dynamically and applied directly to the elements style property using JavaScript.
This technique is referred to as flat shading. It’s an effective method of shading, however it does result in the entire surface having the same detail. For example, if I created a 3D wall that extended into the distance, it would be shaded identically along its entire length. I wanted something that looked more realistic.
A second stab at lighting
To simulate real lighting, surfaces need to darken as they extend beyond the range of a light source, and if multiple lights hit the same surface it should shade accordingly.
To flat shade a surface I only had to calculate the light hitting the centre point, but now I need to sample the light at various points on the surface so I can determine how light or dark each point should be. The math required to create this lighting data is identical to that used for flat shading.
Initially, I tried producing a radial-gradient from the lighting data to use in place of the linear-gradient in my earlier attempt. The results were more realistic but multiple light sources were still a problem because layering multiple gradients on top of each other causes the underlying texture to get progressively darker. If CSS supported image compositing and blending modes (they are coming) it may have been possible to make radial gradients work.
The solution was to use a element to programatically generate a new texture that could be used as a light map. With the calculated lighting data I could draw a series of black pixels, varying each ones alpha channel based on the amount of light that would hit the surface at that point. Finally the canvas.toDataURL() method was used to encode the image and use it in place of the linear-gradient in my first experiment. Repeating this process for each surface produces a realistic lighting effect for the entire environment.
Calculating and drawing these textures is intensive work. The basement ceiling and floor are both 1000 x 2000 pixels in size, creating a texture to cover this area isn’t practical so I only sample lights every 12 pixels, which produces a light map 12 times smaller than the surface it will cover. Setting background-size: 100% causes the browser to scale the texture up using bilinear (or similar) filtering so it fits the surface area. The scaling effect produces a result that is almost identical to a light map generated for every single pixel.
The background style rule for applying a light map and texture to a surface looks something like this:
element {
    background: url("data:image/png;base64,iVBORw0KGgoAAAANSUhEUgAAACoAAAAyCAYAAAAqRkmtAAACiUlEQVRoQ9VZa0vEQAy8+/8/yPcbFVFEEREREcS/4eNSmpKmmU12t/XYD6W3beGmk8kk2a5Xq9XR5vjeHD+B47d/xjrTtdSxud3dl+d+OTmt+yvDmX4c9n8eAbtVoAeCyRRYBknMb4XRfRVyC6wEqYFK0Cj0HG4OfSr8HG56ZhR6AhoJO2u4JPxInxK4BDYCyYu9YOglk/xbsymvy8RhpjlrNEArqWRCrWlBQEsYRWC98EfAmlm/W8FoBKzWp2aT11KbZugJ6NKMzpJMFlANPJX1Wpdyjdj0NKozv9PoTjD0pRYVDb2b9VGgVtZHNKrLpuelEzb5DRhoRKel1alGox1wGfpmgFIYPbCIUa+MRiuTpdMJox7QrSdTM/bUlOFzZ7SERqM+6pbQZpqSZtq8ZhrnZkaRZoa7ZsblZjYgjgM1vmYClYOd1+LBnpRM9iQItLTFQ/0o6vLhXH9aCTTaOWnAehp1K9NZP4rUbufo2UnP9ajV82b6Tg70FudiZtKtHmrtoiOIpU9PpzD0Fwoo2n6sbZo9gJJZcwq9DGi0JpFyhjuoU7pxtSCjtXP9aDfv2gFaOoJofaKst5JJ+ukwM91kMirtyMp0a5MsOtyZicSobxMaLd3K0dZksZlt+HcZoUdsImZTY0g20PtA6OeypohFQR99MCqTDnnqA0NKp7My+ggYjerz34A+LQRUsolCrnWaNPznSqCoeyo1e/bV0T4+LV4KgCJwJAPNZI41WfV+MPzXAFDLluY2e83kqDoR2jcD6ByJhJoRrUtea31OgL4roCU9aORDWMRDIav0Fh890JR3lnz/1GVU1nsGlJX1n4UaRQkV6ZpQ+Uwm05ej0TkSycp8i2Hoo3+utUtvDhk9pwAAAABJRU5ErkJggg==") 0 0 / 100% 100%, url("texture.png") 0 0 / auto auto;
}
Which produces the final lit surface:
Casting Shadows
Settling on canvas for lighting made casting shadows possible. The logic behind shadow casting turned out to be rather easy. Ordering surfaces based on their proximity to a light source allowed me to not only produce a light map for a surface but also determine if a previous surface had already been hit by the current ray of light. If it had, I could set the relevant light map pixel to be in shadow. This technique allows one image to used for both lighting and shadows.

Collisions
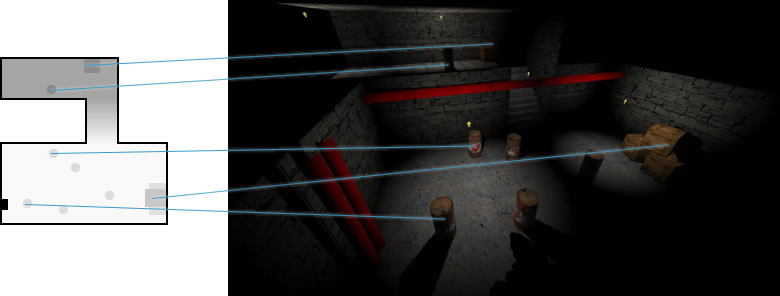
Collision detection uses a height map – a top down image of the level that uses colour to represent the height of objects within it. White represents the deepest and black the highest possible position the player can reach. As the player moves around the level I convert their position into 2D coordinates and use them to check the colour in the height map. If the colour is lighter than the players last position the player falls, if it’s slightly darker the player can step up or jump on to an object. If the colour is much darker the player comes to a stop – I use this for walls and fences. Currently, this image is drawn by hand but I will be looking into creating it dynamically.
What’s next?
Well, a game would be a natural next step for this project — it would be interesting to see how scalable these techniques are. In the short term, I’ve started working on a prototype CSS3 renderer for the excellent Three.js that uses these same techniques to render geometry and lights created by a real 3D engine.

Keep your files stored safely and securely with the SanDisk 2TB Extreme Portable SSD. With over 69,505 ratings and an impressive 4.6 out of 5 stars, this product has been purchased over 8K+ times in the past month. At only $129.99, this Amazon’s Choice product is a must-have for secure file storage.
Help keep private content private with the included password protection featuring 256-bit AES hardware encryption. Order now for just $129.99 on Amazon!
Help Power Techcratic’s Future – Scan To Support
If Techcratic’s content and insights have helped you, consider giving back by supporting the platform with crypto. Every contribution makes a difference, whether it’s for high-quality content, server maintenance, or future updates. Techcratic is constantly evolving, and your support helps drive that progress.
As a solo operator who wears all the hats, creating content, managing the tech, and running the site, your support allows me to stay focused on delivering valuable resources. Your support keeps everything running smoothly and enables me to continue creating the content you love. I’m deeply grateful for your support, it truly means the world to me! Thank you!
|
BITCOIN
bc1qlszw7elx2qahjwvaryh0tkgg8y68enw30gpvge Scan the QR code with your crypto wallet app |
|
DOGECOIN
D64GwvvYQxFXYyan3oQCrmWfidf6T3JpBA Scan the QR code with your crypto wallet app |
|
ETHEREUM
0xe9BC980DF3d985730dA827996B43E4A62CCBAA7a Scan the QR code with your crypto wallet app |


Please read the Privacy and Security Disclaimer on how Techcratic handles your support.
Disclaimer: As an Amazon Associate, Techcratic may earn from qualifying purchases.


