


2025-09-08 14:57:00
mikkel.hoegh.org
Motivation
For a moderately security conscious geek like myself, there can be a number of
reasons to want to set up a home VPN server:
- Accessing your home computer via screen sharing without exposing it to the
Internet (and thereby to potential evil-doers). - Accessing servers with IP white lists (common case for security hardened IT systems).
- Accessing county-IP-filtered things like Netflix while travelling.
- Browsing privately from insecure WiFi networks.
- Getting access to services that are blocked inside restrictive corporate networks.
I have use cases for all of those from time to time, and after a bunch of
frustrated attempts at getting OpenVPN working as I want it to, I decided to
try Wireguard, a fairly new VPN software that promises to cut through some
of the complexities of OpenVPN or IPSec, while delivering a secure
(and fast) connection.
Getting it set up can be a little tricky if you (like me) don’t usually do a
lot of networking stuff and don’t know all the ins and outs of it, so here’s
my “Wireguard for dummies” explanation.
Important clarification
To Wireguard, there are no dedicated servers or clients, there are only “peers”.
For the set up described here, one side will act as a server, and the other side
as a client, so I’ll use those terms to describe them for clarity.
Installing the Wireguard server
The official Wireguard installation page has instructions for lots of
different platforms. My Wireguard server is on a RaspberryPi (running Raspbian
Buster), so I followed the instructions for Debian, which worked great.
The rest of these instructions should work on any other UNIX-y server
(or even for running Wireguard inside a Docker container if that’s more your speed).
Once you’ve got it installed, we can proceed.
Configuring the Wireguard server, part 1
Generate a private key
Run wg genkey on the Wireguard server, and copy it so we can use it for the
server configuration file.
As the name implies, the private key should be kept private to ensure the
security of the VPN connection.
For this example, we’ll use 6NJepbdEduV97+exampleprivatekeydontusethis= – do
not use that key in your real setup, generate your own.
Server configuration file
Edit (or create) the file /etc/wireguard/wg0.conf to look something like this:
[Interface]
PrivateKey = 6NJepbdEduV97+exampleprivatekeydontusethis=
Address = 10.14.0.0/24
ListenPort = 51820

#replace eth0 with the interface open to the internet (e.g might be wlan0 if wifi)
PostUp = iptables -A FORWARD -i %i -j ACCEPT; iptables -A FORWARD -o %i -j ACCEPT; iptables -t nat -A POSTROUTING -o eth0 -j MASQUERADE
PostDown = iptables -D FORWARD -i %i -j ACCEPT; iptables -D FORWARD -o %i -j ACCEPT; iptables -t nat -D POSTROUTING -o eth0 -j MASQUERADE
Here, we use 10.14.0.0/24 as the “address” for the Wireguard server. The /24
at the end means we will be using a subnet of all IP addresses from 10.14.0.1
to 10.14.0.254.
This is a separate IP network from my home LAN, and should not overlap with it.
Connecting VPN clients will then use an IP inside this network, and be able to
access my LAN via routing, which we’ll set up later.
Configuring the Wireguard client, part 1
In my example, I’m using the Wireguard client for macOS, but the
configuraiton file format is the same for all clients, so you should be able to
use whichever version you prefer. There are links to clients for macOS, Android,
iOS, Windows and a whole bunch of Linux and BSDs on the aforementioned
Wireguard installation page.
To get started, first create a new tunnel:
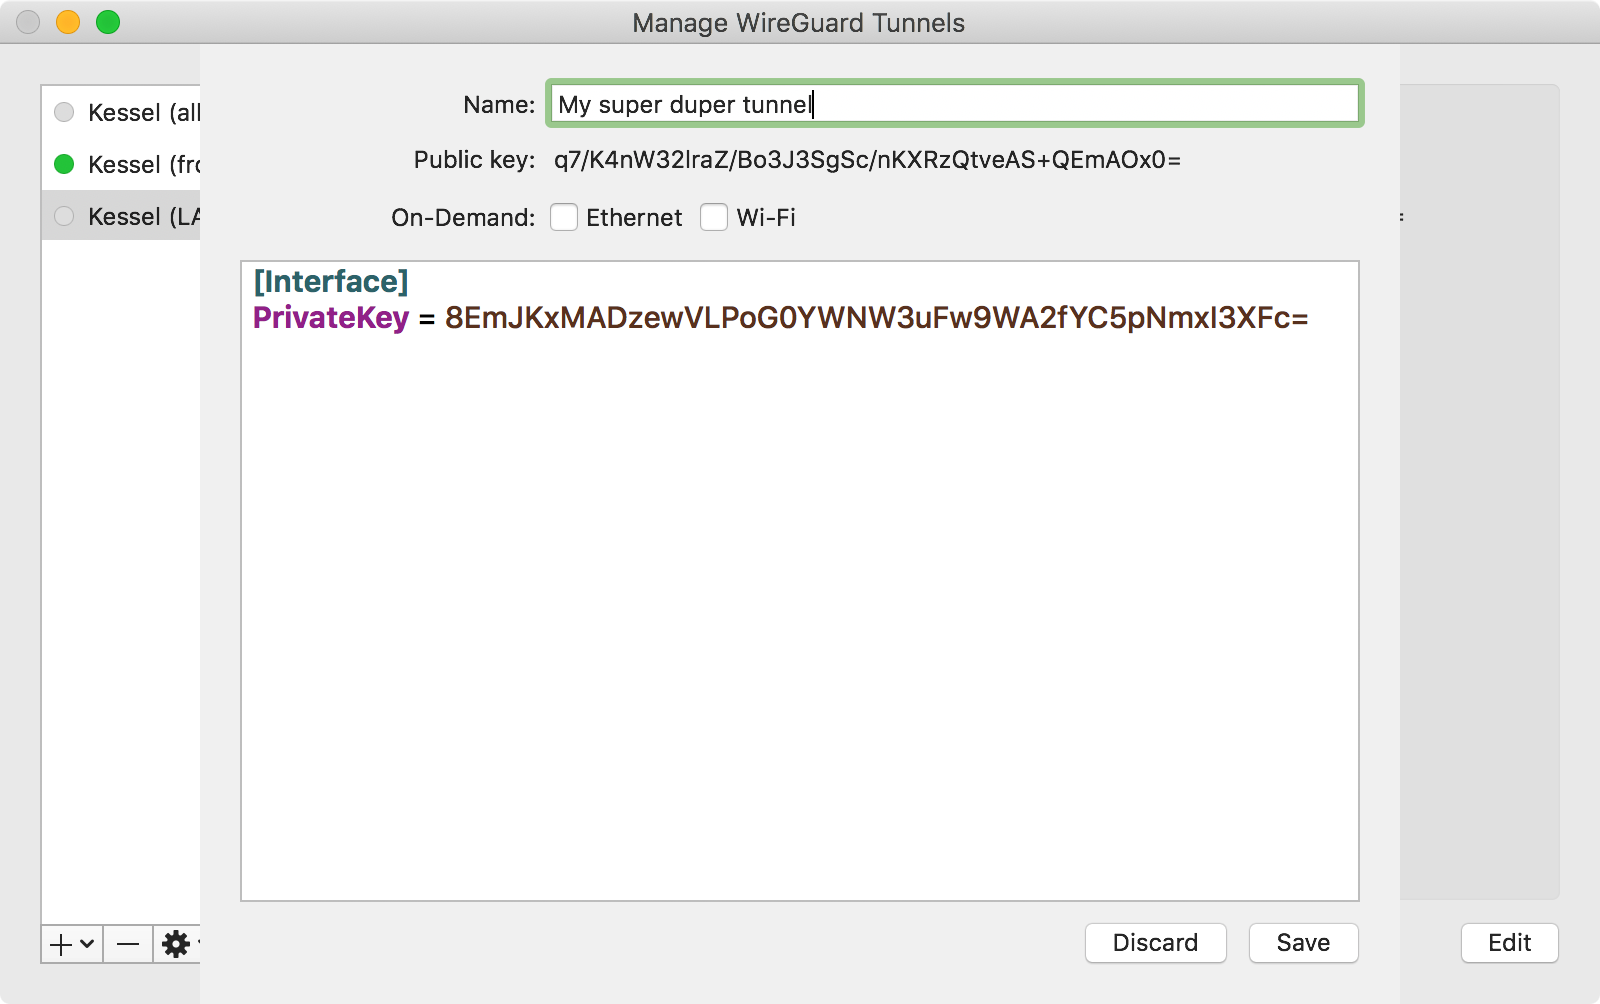
The macOS client fills out the PrivateKey field when creating a new tunnel.
If your client doesn’t, you can generate one on the server with the wg genkey
command we used above. It should not be the same as the private key used in the
server configuration.
Copy the generated public key (again, the macOS client generates it
automatically for us) so we can put it in to the server configuration.
Configuring the Wireguard server, part 2
On the server, edit /etc/wireguard/wg0.conf again.
Below the configuration we added in step 1, add this:
[Peer]
# My laptop (this is just a comment, change it to identify the device)
PublicKey = SOMETHINGSOMETHING+clientpublickeyhere=
AllowedIPs = 10.14.0.10/32
Fill in the public key from the client.
The IP address in AllowedIPs determines which IP address inside the subnet
we set up on the server (10.14.0.0/24) the client should be allowed to use.
10.14.0.10/32 means that the client will have to use the IP 10.14.0.10, and
can thus only have one active connection at a time.
That is a reasonable configuration, in my opinion. If you have multiple devices
you want to connect, you should use separate public/private keys and give them
a different IP address.
Once you’ve added this, we’re ready to start the Wireguard server, do this by
running sudo wg-quick up wg0.
That’ll output something like this:
[#] ip link add wg0 type wireguard
[#] wg setconf wg0 /dev/fd/63
[#] ip -4 address add 10.14.0.0/24 dev wg0
[#] ip link set mtu 1420 up dev wg0
[#] iptables -A FORWARD -i wg0 -j ACCEPT; iptables -A FORWARD -o wg0 -j ACCEPT; iptables -t nat -A POSTROUTING -o eth0 -j MASQUERADE
When that is done, check the server status by running sudo wg.
That should output something like this:
interface: wg0
  public key: ASDFJKASDFSERVERPublicKEyHERE=
  private key: (hidden)
  listening port: 51820

peer: SOMETHINGSOMETHING+clientpublickeyhere=
  allowed ips: 10.14.0.10/32
Copy server’s public key from the status info, so we can use it to configure
the client.
Configuring the Wireguard client, part 2
Now the server is running, we have everything we need to configure the client.
Go edit the tunnel we created earlier, and change the configuration to something
like this (leaving the private key we set up earlier alone, so it matches the
public key in the server config):
[Interface]
PrivateKey = SOMETHINGSOMETHING+clientprivatekeyhere=
Address = 10.14.0.10/32
DNS = 10.42.0.1

[Peer]
PublicKey = ASDFJKASDFSERVERPublicKEyHERE=
AllowedIPs = 0.0.0.0/0, ::/0
Endpoint = you.example.net:51820
There are a few important thing to keep note of here, when adopting this
configuration for your own use:
-
The
PublicKeymust be the public key of the server. Each side has its own
private key and the other side’s public key. -
The
Addressin the[Interface]section on the client should match the
AllowedIPsset in the[Peer]section on the server. -
AllowedIPson the client determines what IP addresses are routed through
the VPN connection. Here we use0.0.0.0/0as a wildcard to ask that all
traffic is sent through the VPN. That is what you need for reasons 2-5
described in the motivation section. If you just want to access your home LAN
through the VPN, and use your regular network connection for everything else,
fill in its network instead, e.g.192.168.1.0/24.::/0does the same for IPv6. -
The
DNSentry defines the DNS server that’ll be used when trying to access
the network through the VPN. In this example, it’s the IP address of the router
in my home LAN. -
Endpointis the hostname (or IP address) plus port number where the Wireguard
server can be reached. If you have the average home LAN, you’ll
need to set up port forwarding in your home router to make the Wireguard
server accessible from the Internet.How this is done, is different from router to router, so I can’t provide much
more detail than that.If you don’t have a static IP, you’ll probably want to set up dynamic DNS, too.
Final touches
To allow clients connected to your Wireguard server to connect to your LAN
(and the Internet), you’ll need to configure the server to act as a router.
On Raspbian, this is done by editing /etc/sysctl.conf and editing the
net.ipv4.ip_forward line to say net.ipv4.ip_forward=1. If the line is not
present already, add it.
For IPv6 routing, also set net.ipv6.conf.all.forwarding=1 in the same file.
You’ll also want Wireguard to start automatically on reboot. On Raspbian, this
is done by running:
sudo systemctl enable wg-quick@wg0
Once that is done, try rebooting to see if everything loads correctly and ensure
the IP forwarding we enabled is loaded correctly.
After rebooting, running sudo wg should give you the same output as before,
indicating that the Wireguard server is running as expected.
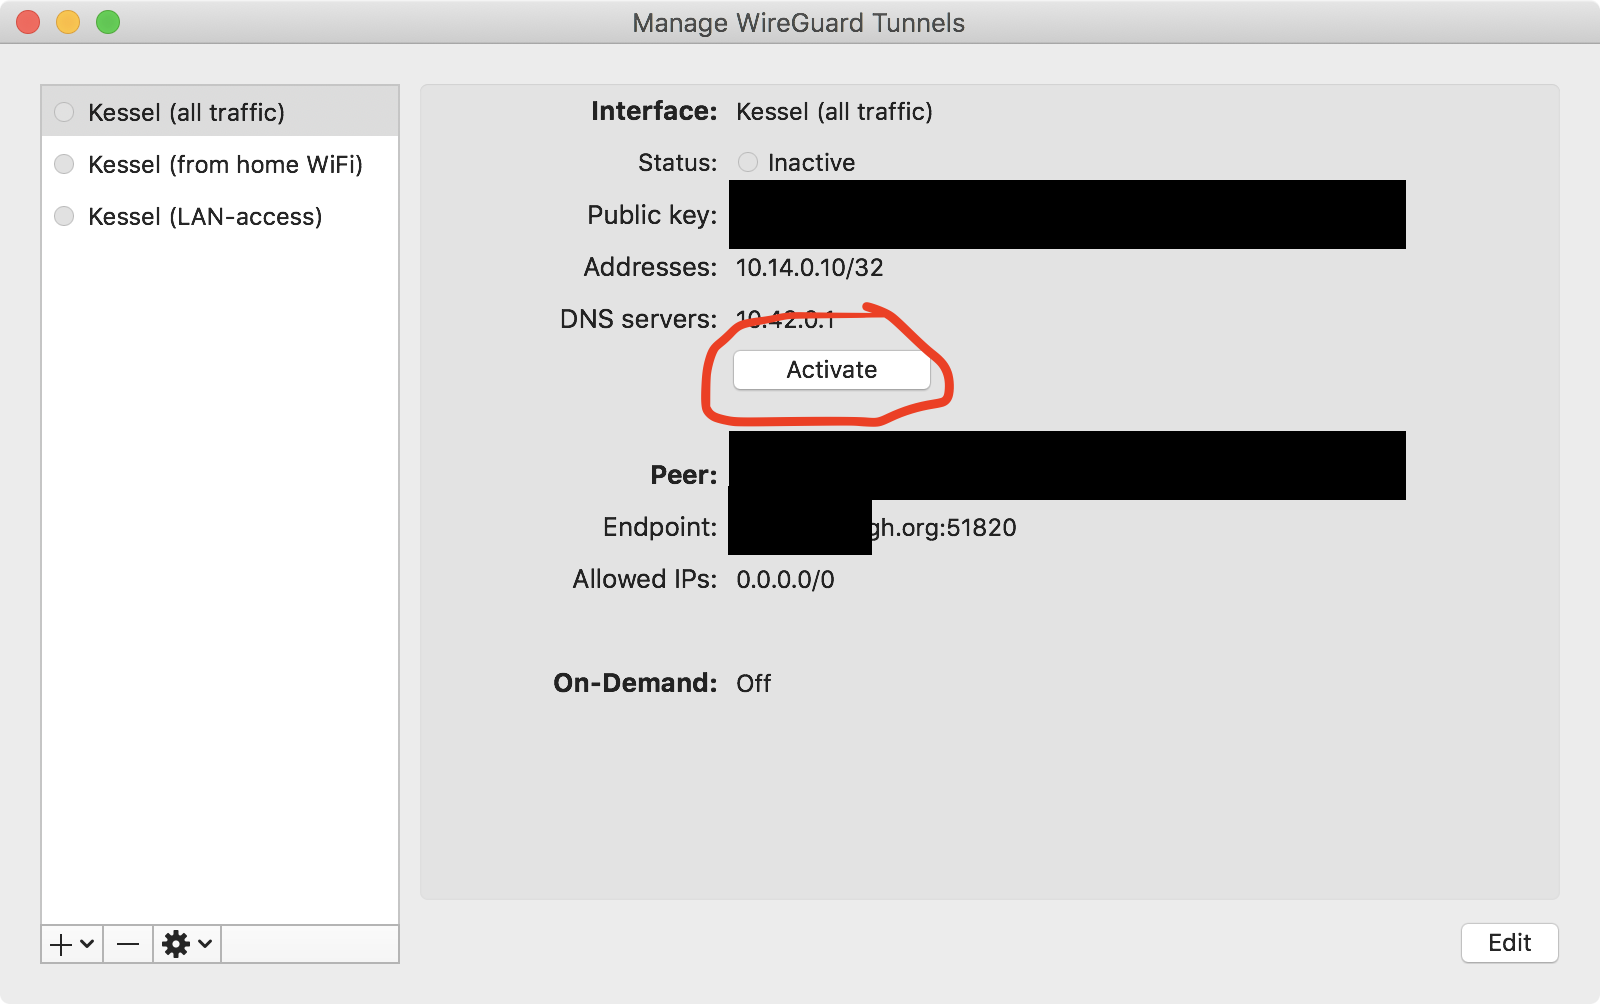
Try it out
Once that’s all done, you should be able to connect, on macOS that can be
achieved via this activate button (sensitive details redacted):
If all goes well, you should see the information change to indicate data flowing
through the VPN connection, like this:
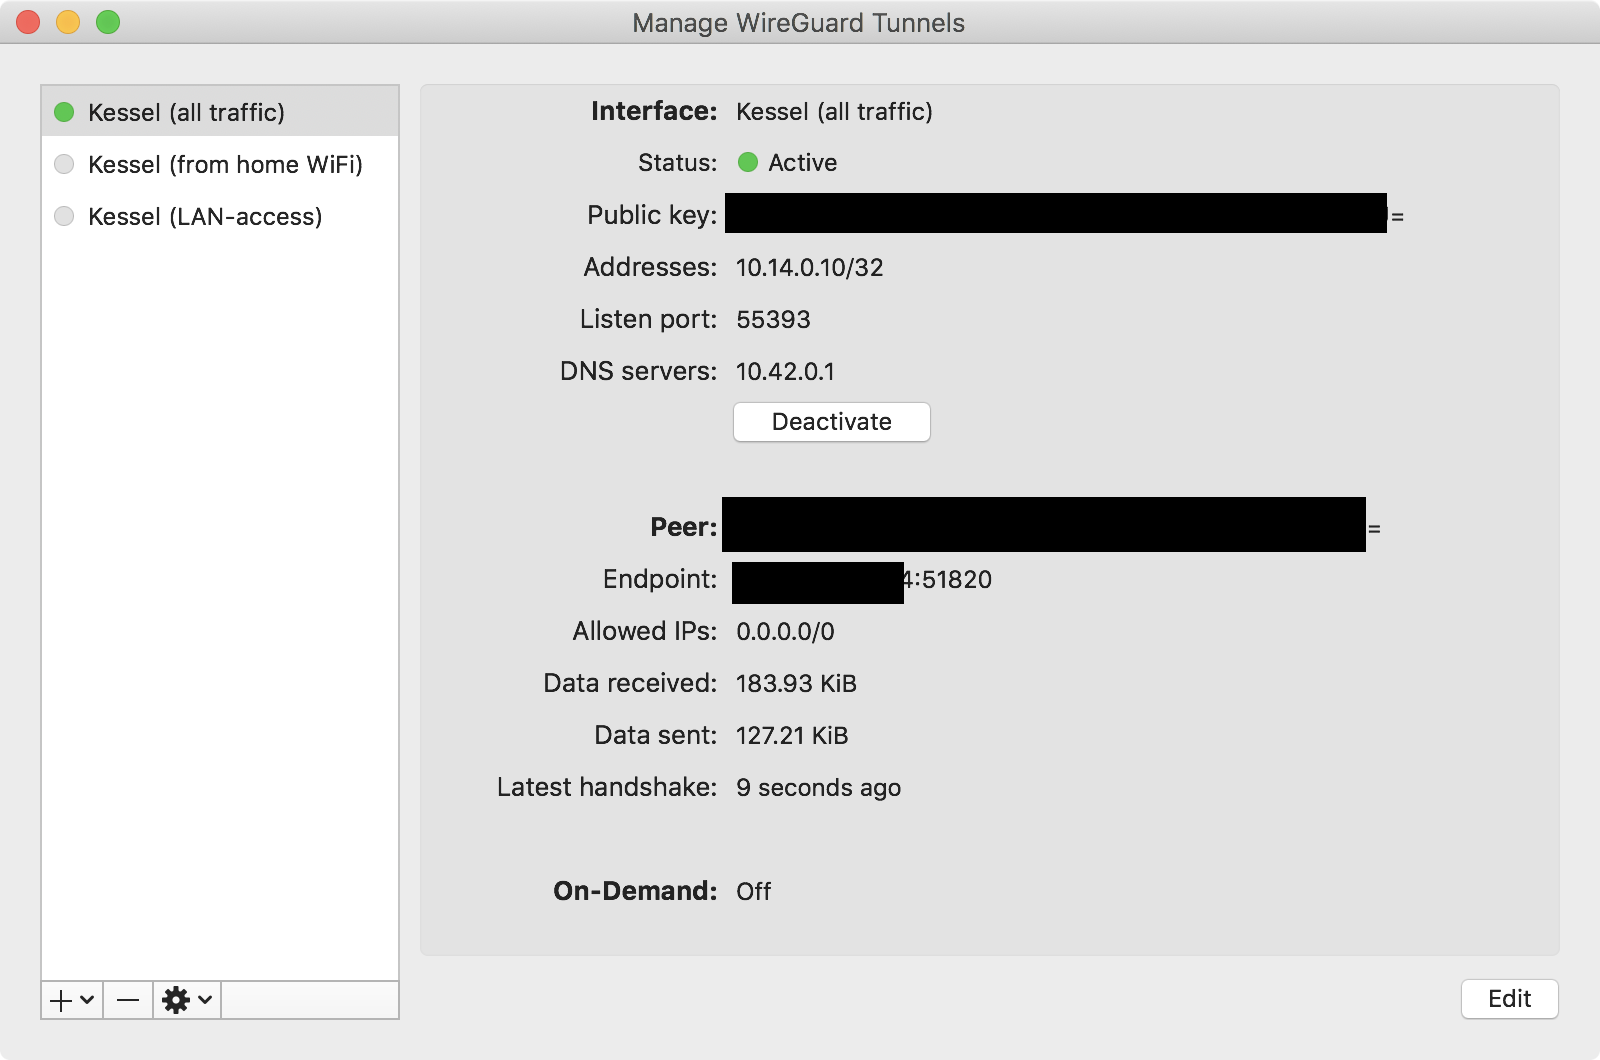
As you can see, I’ve set up multiple tunnel configs, one forwarding all traffic,
and one just giving access to the home LAN.
If you connect to the server and run sudo wg, you should see something like this:
interface: wg0
  public key: ASDFJKASDFSERVERPublicKEyHERE=
  private key: (hidden)
  listening port: 51820

peer: SOMETHINGSOMETHING+clientpublickeyhere=
  endpoint: 11.22.44.88:55393
  allowed ips: 10.14.0.10/32
  latest handshake: 51 seconds ago
  transfer: 284.68 KiB received, 421.42 KiB sent
Acknowledgments
I wrote this after having the friendly people in the #wireguard channel on
Freenode (IRC) help me understand Wireguard better. Thanks, y’all.
This document and its illustrations are released under the terms of
Creative Commons CC0, and are thus free for anyone to use as they wish.

Keep your files stored safely and securely with the SanDisk 2TB Extreme Portable SSD. With over 69,505 ratings and an impressive 4.6 out of 5 stars, this product has been purchased over 8K+ times in the past month. At only $129.99, this Amazon’s Choice product is a must-have for secure file storage.
Help keep private content private with the included password protection featuring 256-bit AES hardware encryption. Order now for just $129.99 on Amazon!
Help Power Techcratic’s Future – Scan To Support
If Techcratic’s content and insights have helped you, consider giving back by supporting the platform with crypto. Every contribution makes a difference, whether it’s for high-quality content, server maintenance, or future updates. Techcratic is constantly evolving, and your support helps drive that progress.
As a solo operator who wears all the hats, creating content, managing the tech, and running the site, your support allows me to stay focused on delivering valuable resources. Your support keeps everything running smoothly and enables me to continue creating the content you love. I’m deeply grateful for your support, it truly means the world to me! Thank you!
|
BITCOIN
bc1qlszw7elx2qahjwvaryh0tkgg8y68enw30gpvge Scan the QR code with your crypto wallet app |
|
DOGECOIN
D64GwvvYQxFXYyan3oQCrmWfidf6T3JpBA Scan the QR code with your crypto wallet app |
|
ETHEREUM
0xe9BC980DF3d985730dA827996B43E4A62CCBAA7a Scan the QR code with your crypto wallet app |


Please read the Privacy and Security Disclaimer on how Techcratic handles your support.
Disclaimer: As an Amazon Associate, Techcratic may earn from qualifying purchases.


